Wednesday, April 25, 2018

Cold Wars Theme Event, Game 2 - DBA AAR

The second game of the Themed Event was against Mike G and his Later Sassanid Persians.


Finally, someone else managed to win the initiative roll, and so I became the defender. I chose two gentle hills, two brush, and a BUA.


Unfortunately, due to the BUA's location, I was unable to deploy my full line, which caused a couple traffic jams as Mike's army approached.


With a lucky roll for pips, however, I was able to get most of my own units up and ready for combat. Mike's movement stopped just short of combat.


Then, with a resounding crash of metal, men, and mounts, the two battlelines smashed into each other. With so many combats, Mike and I decided it was likely that this turn would be the last.

And as it turned out, it was! While Mike was able to knock out two of my units, I took out four of his, and so won 4-2.

Monday, April 23, 2018

A Walk in the Market - Gangs of Rome AAR

Bill, Keith and I gathered to play Gangs of Rome last Friday night at Half Day Studio

We decided to play the "Careless Is as Careless Dies..." scenario, which works well with three players. Bill's objective was to escort his Dominus off one of two board edges, past the other players. Keith and I were technically allied, but only one of us could win in the end, depending on who brought down the Dominus. 


Bill loosely deployed his fighters in the center of the table, surrounded by mobs. Keith and I set up our fighters to block the open table edges that Bill's Dominus could escape from.

The gangs that Keith and I took were relatively restricted due to the scenario. We each had to have three fighters and 65 points. This meant that Keith's gang, which met the points limit exactly, couldn't take any Denarii. My gang costed 63 points, so I was able to take a Throwing Blade and a Thrown Javelin.


During the first turn, Bill chose my side as the one he planned to escape from. He moved his gang towards me, while Keith hurried to keep his gang members close. I was able to launch a couple mobs into Bill's gang, and even manage to do two damage to the Dominus (who, with only six Flesh and no defenses, was extremely easy to target and wound...)


Keith's fighters threw themselves into the fight, forcing Bill to defend his flank. Bill also sent out a fighter to try and stop one of my gang members from using her Throwing Blade.


Despite Bill's efforts, I was able to use the Thrown Javelin's range and the Dominus' lack of defense to strike the old man down, technically ending the game.


However, we did continue the turn to see how it would end. Keith lost all three of his models in fights with Bill's gang. And Bill lost a fighter when not one, but two mobs went into a rage and tore the poor woman limb from limb!

It was an interesting game, although Bill was at a slight disadvantage as we were using one less mob and one less defending gang member than the scenario required. It also seemed a little too easy for attacking gang members to hit and wound the Dominus with ranged attacks.

Wednesday, April 18, 2018

Cold Wars Theme Event, Game 1 - DBA AAR

On the morning of my second day at Cold Wars 2018, I took part in a Themed Event for DBA, based around the Early Byzantines and their enemies. As I had the previous day, I used the III/13b Avars list, with its mix of Cavalry, Light Horse, Auxilia, and Psiloi. 

My first opponent was Nick and his Italian Ostrogoths. 


Nick placed two plough, an enclosure (the green field), and a wood on the table.


While my line shuffled forward, Nick used his pips to maneuver his knights from column to line. I decided to try and reach Nick's camp with my two light horse for an early victory point.


That, however, turned out to be a terrible idea, as Nick was able to simply force both units of the table with his psiloi.


The shooting from the Ostrogoths was then able to break my line into unmanageable chunks, and a poor combat saw one of my cavalry units fall to an opposing unit of knights.


The game ended when Nick was able to overlap my cavalry, removing a unit from the table and winning 4-0. Apparently I hadn't learned much from the previous day!

Friday, April 13, 2018

Training Match - Arena Rex AAR

Earlier this week I brought out Arena Rex to demo with Bill.

I let Bill chose two Cohorts of three fighters from my Ludus Magnus collection, and then let him pick which group he'd like to play in the game. 

Bill ended up with Otho Mentulus, Marcus Furius, and Viatrix, while I had Hermes, Tribune, and Urbicus. 


The game was a simple fight to the death - whoever had the last fighters standing would claim victory.

I set up four marble columns as hazards, and two pits as lethal hazards.


Both Cohorts advanced across the sands as the crowd cheered and roared in anticipation.


First blood went to Bill, and Otho managed to quickly cut down Tribune with a few savage strokes of his sword. The other members of our cohorts fought dangerously close to the edge of a pit.


Urbicus cut down Marcus Furious, but was quickly confronted by Otho.


Unfortunately, Otho's engagement meant that both my gladiators were unable to use their Favor, and so Hermes was eventually whittle down and removed from the fight.


However, Urbicus managed to get a decent enough attack in so that he could shove Otho into the pit. Suddenly it was just down to the two remaining fighters, and Urbicus was exhausted.


Viatrix delivered a brutal final blow to the opposing gladiator, leaving her alone on the blood soaked sand. 

It was good to bring Arena Rex out again. It's a light yet complex set of rules, and even a small game with three gladiators aside has a lot of moving parts. I'm hoping to get it to the table more often. 

Wednesday, April 11, 2018

Cold Wars Open Event, Game 4 - DBA AAR

In the last game of the Open Event, I faced Mike D and his Warring States Chinese again. 


As the attacker, I watched as Mike placed down two plough, two difficult hills, and a river. I decided to set up so that the river would split our armies in two.


Both sides advances cautiously, now aware of the other's capabilities after the result of the first game.


I decided to push on the right, hoping I had the advantage against Mike's troops. However, I only managed to recoil his line.


On the next turn, I swung my main line into battle, and removed one of Mike's crossbowmen.


While our lines pushed and shoved each other, Mike removed an auxilia from my right.


In one desperate push, the game ended. I lost a light horse and a cavalry from my right flank. On my left, however, I not only managed to sack Mike's camp, but I also killed his general, a unit of blades, and a unit of light horse. The Avars secured their first victory, 6-3.

Friday, April 6, 2018

Blood in the Banakur - Shatterlands AAR

While at Cold Ward, I got the chance to take part in a demo game of Shatterlands, by Stonegate Forge. I found the setting intriguing, the miniatures fantastic, and the rules to have some rather interesting mechanics. So my loot pile at the end of the convention contained the starter sets for the currently available factions. 

After getting the Rapani warriors and Dumah rangers painted up, I put on a demo game at Half Day Studio


The mission was a simple random encounter with each side taking two miniatures per player. I had picked out five miniatures with 2 Initiative each on both sides for the players to chose from, which made it an 8 point game.

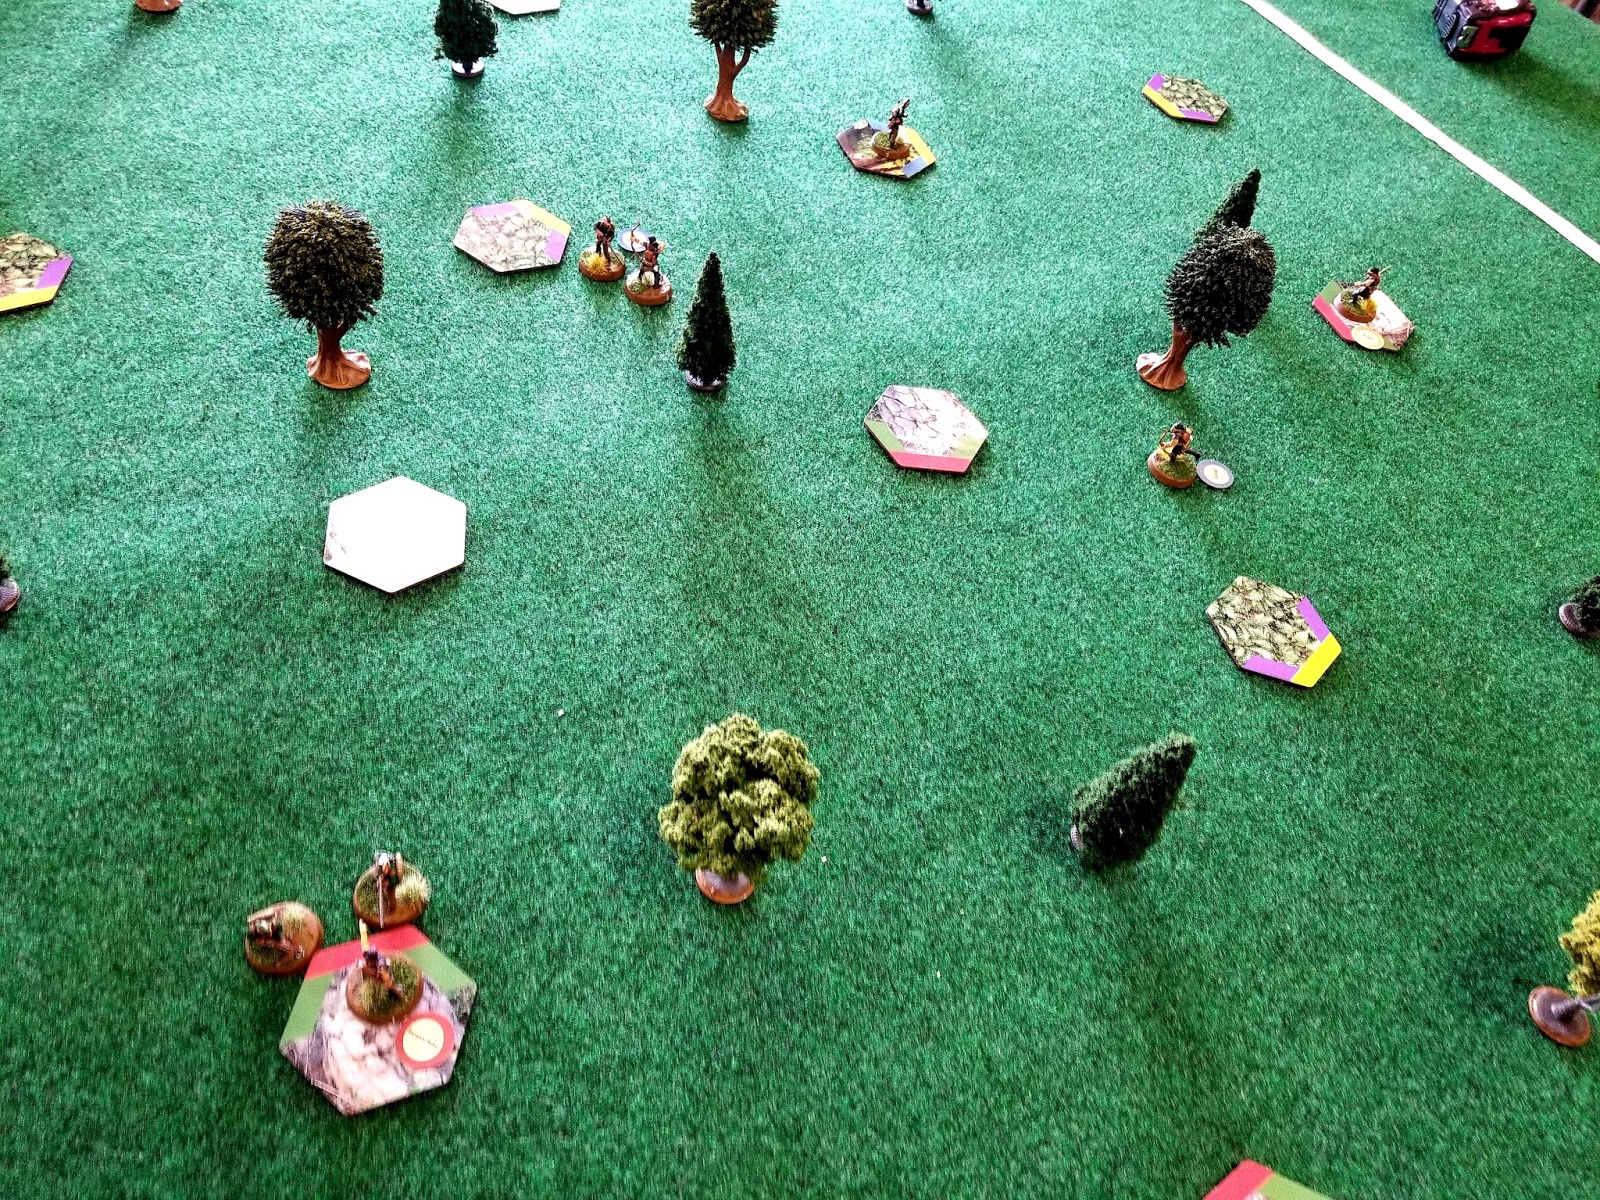
As you can see, "terrain" in Shatterlands comes in the form of three types of terrain tiles - brush, trees, and rocks. These affect the kind of dice added to determine hit locations when models fire at one another. From what we've seen, Shatterlands is a game that needs a lot of terrain - models caught out in the open are much easier to kill.


With a few lucky draws from the Initiative Deck, the Dumerai managed to get halfway up the table, into cover, and ready for any Rapani moving onto the board.

This may have been a mistake, however, as the Rapani were able to dash through the trees, avoid the Dumerai rifles and Kesbinets (crossbow/carbine combi-weapons), and close for hand to hand combat.

You may also spot a lot of colorful dice on the table. Shatterlands uses RPG dice, associated with certain colors, to denote various qualities. It basically follows ROYGBIV - a trait marked with a red dot on a character card rolls a d20, while a trait marked with a purple dot rolls a d4. And you want low numbers in Shatterlands.


The Dumerai found themselves being pushed back as the Rapani were able to quickly advance. It also didn't help that the rangers couldn't spend their actions to reload their guns, while the Rapani could fire their bows without pause.


However, as both sides began to take wounds, their Squad Morale decreased, making certain actions more difficult. It also didn't help when one Rapani warrior rolled high during his Sprint action, leaving him stranded in the open.


For a moment, it seemed that the Dumerai might turn the fight around, as two of the rangers ganged up on a lone Rapani warrior, who was incapacitated, causing a big morale hit and stunning several of the other Rapani.


But before the Dumerai could capitalize on the advantage, the Rapani rallied and assaulted a Dumerai rifleman. The ranger couldn't keep the Rapani knives from scoring deep cuts into his flesh, and his comrades watched in horror. Unable to assist, this caused enough morale damage that eventually all the ranger could do was flee, which caused a series of cascading morale failures that saw the Dumerai force run from the table.

It was a fun game, and both sides enjoyed playing. It was also interesting to see the after game, where the surviving characters (and others that gained experience) improved their skills. That's another interesting aspect of Shatterlands - character cards are printed on lottery cards, and as they take injuries and gain experience, you scratch off circles to change the dice they roll when taking actions in the game.

I'm hoping to get this to the table again, especially since I also purchased a scenario book while at Cold Wars.

Wednesday, April 4, 2018

Cold Wars Open Event, Game 3 - DBA AAR

My third game in the Open Even was against Mike G, the event organizer, and his Qaramita. This brought back memories from last year, when Chris and I played in a double tournament for ADLG using the Ancient Bedouins, with our goal being to get as many camels on the table as possible.


Once again, I won the roll for attacker and Mike set up the table. He placed down three dunes and a difficult hill.


I could only watch as the massive line of camels came towards me, completely unhindered by the dunes.


I was basically stuck trying to fight three battles - one in the center, and two in each of the dunes. Thanks to the distances between the dunes, I was overlapped in multiple places and lost a stand of auxilia.


I then lost a unit of cavalry, which left my general exposed.


While I managed to get another unit of cavalry up to support my general, Mike began to turn my left flank, removing another stand of auxilia.


And, finally, Mike caused another of my cavalry units to rout, ending the game with a solid 4-0 victory to the Qarmatians.