Friday, April 26, 2019

Humans vs. Norse, Practice Game - Blood Bowl AAR

Since I'm planning to attend the 4 Diamonds Cup tournament in early May, I've been looking to get the cobwebs out of my Blood Bowl knowledge and get some experience with the team I'll be taking (Humans).

So Sam was kind enough to meet up with me for a practice game. It was also an opportunity for Sam to both get a better handle on Blood Bowl (having only played it once) and to use his excellently painted Norse team. 

With that, the Loch Rysk Warhawks arrived at Loki's Field to play against the Thor's Thunder!


The game started with the Thunder choosing to receive. Of course, some mushroom-and-mead fueled madman in the stands lobbed a rock at the visiting Warhawks and knocked out a Catcher. Somewhat worried, the Warhawks kicked high and the ball landed just short of the scrimmage, right in front of a Thunder player.


The Norse made for a quick drive up the side of the pitch with a loose formation, but couldn't stop the Warhawks from knocking the ball carrier down.


Undaunted, the Thunder launched a fierce counter attack, opened a hole and ran the ball in for an early score.


After both teams set back up, the Thunder kicked off, with the ball scattering off the pitch and handed to the Human's Thrower. The Warhawks moved up and tried to make an opening, while trying to avoid the rampaging Yhetee that had knocked down the opposing Ogre.


The Warhawks got a lucky break when the Ogre recovered from a single turn of being Bone-headed, blitzed the Yhetee and punched its lights out! This also opened a hole in the Norse line that the Warhawks' Catcher sprinted through. When the Thrower, however, tried to follow up, he got tripped up and went down hard.


Both teams scrambled for the ball, but the Warhawks recovered it first and sent it downfield to the waiting catcher, who moved to just outside the endzone. Feeling safe in their numerical advantage, the Warhawks took the opportunity to do some damage to the Norse before the end of the first half.


When the Thunder couldn't deal out any pain in return, the Warhawks scored at the end of the first half to tie up the score.


With the second half starting, the Norse found themselves down several players, with some unconscious and others dead.


The Warhawks were looking to knock out a few more players before pressing forward with the ball.


The Thunder coach, seeing his players getting knocked around, waved a few hand signals. The team took the hint and disengaged to a new line, waiting for the Warhawks to approach.


The Warhawks obliged on one side of the pitch, but the Ogre went Bone-headed again.


With the Ogre recovering its meagre wits, the Warhawks slammed into the Thunder defensive line, and finally made a move to hand the ball off to the Catcher and ready him for a run at the endzone.

However, in a move that had the Warhawks' coach chewing at his clipboard in anger, the players made a positioning mistake, which let the Thunder blitz the ball carrier, recover the ball, and sprint down the side of the pitch without any opposition!


The Warhawks managed to shove the ball carrier off the pitch (and their obliging fans beat the opposing player unconscious), but the ball landed nearly in the middle of the field - right where another Norse player could sneak through the Warhawks line and pick it up!


Scrambling to prevent a sudden loss in the last turn of the game, the Warhawks surrounded the Thunder player and stopped him from running the ball in. It all came down to a failed pass that scattered off the table and was thrown-in multiple times before finally landing back in the pitch just as the whistle was blown for the end of the second half.

The game ended in a tie, 1-1.

It was a close one, however! Had I waited maybe another turn, or better protected the Catcher, I probably would have had a chance to score and prevent Sam from scoring in a couple turns.

I do like my extra skill placement - two Guard Blitzers, a Tackle Blitzer, a Leader Thrower, and a Block Ogre. It meant that I had a decent armor threat with the Ogre, a 13-deep bench, and three re-rolls per half.

I'm not wholly confidant of my chances to win any game at the tournament, but at least I'll be able to scratch Humans off the list of teams that I have painted and need to play with (next will be Orcs, and then I'm free to get more teams!). 

Wednesday, April 24, 2019

Opening Festivities - Carnevale AAR

After getting back from Cold Wars, I met up with Kevyn, who I hadn't seen in a while. After catching up, we finally got a chance to play Carnevale. 

We both backed the project way back in the summer of 2017, before I had moved away for my current job. I decided to pick up the starter set and get most of the Guild, while Kevyn chose the Doctors (I was surprised he didn't pick the Strigoi, but as he explained, plague doctors beat vampires any day of the week). 


One of the coolest parts of the kickstarter campaign (and the two player starter) was the inclusion of 1'x1' paper tiles with canals and streets on them, along with paper bridges and actual 3D paper buildings of two different heights. With these and some 3D printed barrels and crates, it created a fantastic looking area to play in.

Kevyn's Doctors consisted of a Doctor of the Mind as a Leader, an Alchemist Doctor, Morgue Doctor, and a Warden for Heroes, and a Carrion and two Madmen for Henchmen. My Guild was lead by a Capodecina, along with a Barber, a Butcher and a Recruiter for Heroes, and three Citizens as Henchmen.

The scenario was Gang Wars, and the objective was simple - kill more of the opposing faction by the end of five turns.


My Capodecina, Barber, and Butcher each leaped across the canal using a gondola, and the Capodecina easily used his speed to reach the Carrion.


On the other side of the square, my Recruiter urged the Citizens forward as the Alchemist Doctors scaled a building.


The center devolved into a bloody melee. While my Capodecina took out the Carrion, the Barber and the Morgue Doctor got into a shaving-razor-on-scalpel fight.

It was at this time that Kevyn and I decided that his Doctors needed to get their magic, and quick. We had started the game thinking that we'd give magic a miss for the first experience, but quickly realized that without some thaumatergical backup, the Guild were going to roll over the workers of the Ospedale like a tidal wave.

So Kevyn quickly put together spells for his Doctor of the Mind and Morgue Doctor (Blood and Fateweaving Disciplines, respectively), and then used that magic to shred my Butcher before he could get to grips with the enemy.


As soon as they had the chance, my Citizens charged the Alchemist Doctor. While their improvised weapons weren't strong individually, there were enough of them that damage started to get through.


Not wanting to deal with that, the Alchemist Doctor fled, leaping to the bridge and throwing bombs behind him. Two of the Citizens managed to shake off the damage and charged again, but the third missed her leap and fell into canal.

The Capodecina ran towards the Doctor of the Mind, blades flashing, while the Warden charged the Barber.


While the Alchemist Doctor escaped again and had a Madman take his place against the Citizens, the Capodecina and his twin blades made short work of the spellcasting Doctor of the Mind, killing the Doctors' leader in turn four. 

At that point, we decided to call the game, since it was only going to end one way. 

Despite having to check the books a lot, and some confusion in the wording of the rules, Kevyn and I had a great time with the game. It's fun and the rules evoke a lot of the movement and speed that the models can pull off, leaping across canals and easily clambering up and down the sides of buildings. Combat is simple but can be brutal, and the Destiny Die adds an extra twist of fun when rolling to attack, jump, or to drown an enemy!

I'm glad that I picked up the two player set, as I can also paint up the Rashaar (i.e., Cult of Dagon) that came with it. Since the Guild is one of the armies/warbands I'd like to paint up this year, it's now on my painting table.

Wednesday, April 17, 2019

Snowblind - Chain of Command AAR

My second game at Cold Wars 2019 on Saturday was Chain of Command. I'd heard a lot of good things about the system (also a lot of bad. TooFatLardies products seem to get love/hate reactions out of wargamers). So I signed up thinking I'd get my chance to try the rules myself. 


The scenario was based around the Battle of Suomussalmi between Soviet and Finnish forces in late 1939. The Soviets were holed up in the ruins of a small village and had to hold out against attacking Finnish infantry. The snow was so deep that no running was allowed.

I was one of the two Finnish commanders, and we faced off against two Soviet commanders.


The first thing the Finnish did was to deploy a medium machine gun team in the woods opposite the village. This turned out to be the MVP unit for the Finns - it did most of the damage to the Soviets as the rest of the Finnish infantry struggled in the snow.


We also brought on an assault section with SMGs and a LMG team, hoping to reach the stone wall quickly.


Unfortunately, a massive Soviet section appeared just behind the wall and opened fire on the approaching Finns.


As the skirmish developed, the Finns' plan was pretty clear - attack the extreme flanks of the Soviet position while the MMG hammered away at the center.


For a couple turns, it seemed like the Finnish forces might actually succeed, especially when the Soviet infantry and MMG at the center of the village were broken and started to flee.


However, the Soviets had reserves, and a turn or two of good shooting saw the Finns scythed down like wheat in a field.


As the attack on the Soviet's left flank was completely repulsed, the Finns finally lost enough morale and called off the attack, leaving the enemy in control of the village.

While the guys I was playing with were a great group, something about the Chain of Command rules didn't quite click with me. It might have been the massive migraine I was suffering from at the time, but the game seemed a little too detailed for the scale it was trying to pull of. While mostly enjoyable, I wasn't moved to pick up the rules or any models.

Friday, April 12, 2019

Starlight, Starbright - Red Book of the Elf King AAR

Yesterday, Sam and I decided to meet up at the local community center (which turned out to be very nice, so we're planning to use it for future games!) to play our first full sized game of Red Book of the Elf King. 

We're running a four-player game this weekend (basically a regular game but with two Thanes per side), so we wanted to re-familiarize ourselves with the rules, as well as get our painted miniatures on the table. 

Sam used Vachel Goldenhand as his thane, while I used Lowic, Hero of the Ecanna. Vachel is the most combat focused Thane in the game, while Lowic is close behind in melee ability, so we thought it'd be an interesting match. 


We set the table up with some impassible and rough terrain and decided to play the Star Fall scenario. You can see the piece of starmetal at the center. Both sides start off the table and move on during the first turn. Either player's Thane need to grab the starmetal counter and move off the table by the end of turn seven, or take out the opposing player's Thane.

The complication is that the starmetal's power gives the Thane a Penalty Token at the start of the turn. A very important detail, as Sam and I were about to learn!


During the first turn both sides moved onto the table. I managed to use a Glamour (Red Book's version of spells for the Elf factions) to remove the activation tokens from my Thane and surrounding Companions, which gave me a decent headstart on moving towards the objective.


Both Thanes watched as their Companions formed shieldwalls and advanced. The starmetal sat, emanating waves of power.


We used this game to get our heads around combat in Red Book. It's fairly straightforward, but in our previous game we played as though you just rolled dice and assigned hits like most other unit-based rules. However, a reread revealed that only shooting works that way. In melee, fighters square off as evenly as possible.

This made combat a little slower, but it felt more tactical. And with such a relatively low model count, it went faster as we got into the rhythm of declaring combats and rolling dice.

The first round of fights were fairly bloody, with Lowic's Companions forcing Vachel's warband back. Lowic took the opportunity to move up and claim the starmetal - a fateful choice.


As Sam and I quickly discovered, the single penalty counter that the starmetal gave to the Thane holding it was detrimental, especially when you rolled low for activation counters. It also didn't help when Sam used a Glamour to restart the turn after I had gotten ten activation counter's to Sam's five.

Lowic was stuck holding the starmetal as his Companions kept the opposing warband at bay.


However, the tide began to turn against Lowic, and he soon found himself stranded as his warriors were pushed back, bloodied and weary.


And fate showed its displeasure for the Elven Thane when he failed the Courage test needed to remove the Penalty Counter at the end of the sixth turn, and ended up with two!

In Red Book, units can be given multiple Activation Counters, but only if they're evenly spread out. Penalty Counters are also included when dealing out Activation Counters, so every other unit in the warband would need to be given a Counter before Lowic could be given one! He was thoroughly stuck in the middle of the board.


Vachel now had a good chance of, if not retrieving the starmetal, then at least striking Lowic down. To prevent this, I charged unit after unit of Companions into Vachel. While his Sunsword easily cleaved the Elves into neat little pieces, I was able to deal three wounds to the enemy Thane. With only a single wound left, Vachel was suddenly less eager to attack Lowic, who could use his twin swords to defend himself with ease.


And so the game ended with neither Thane able to claim the objective or fell his opponent. Both Circles withdrew from the table to deal with the wounded and dead.

Sam and I both had a great time getting Red Book back on the table, and this second game went a long way to understanding most of the game mechanics. I'm looking forward to playing again, especially since the Troll Wars expansion was recently released. The Troll and Mortal Thanes look interesting, and I'll likely pick them up as soon as more Companion units are released for the two factions.

Wednesday, April 10, 2019

A Brisk Engagement - For King and Parliament! AAR

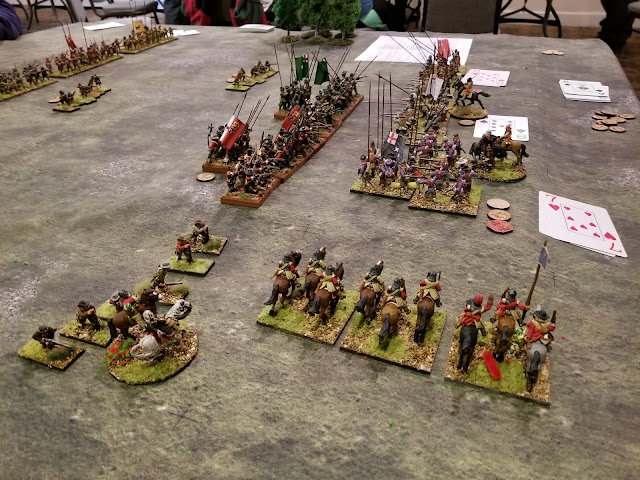
On Saturday at Cold Wars 2019 I signed up for two participation games. One was For King & Parliament, a variation of To The Strongest! and put on by fellow SJGA club member Ted. 


The scenario was a recreation of the Battle of Montgomery, 1644. I was one of two Parliamentary commanders, and we faced off against three Royalist commanders.

Both sides would have six turns to score more Victory Medals. The Royalists started with an advantage in numbers, since the Parliamentarians had two units of cavalry off the table, foraging for supplies.


The infantry battle started with the two sides skirmishing with their forlorn hope units.


And the cavalry got right into the fight, with both sides charging as soon as they could.


The Parliamentarian infantry commanders were having trouble getting their orders to their troops, and so the blocks of pikemen and musketeers sat in place as the Royalists marched across the field.


The cavalry engagement quickly turned against me thanks to some truly awful card draws.


All three of my units were routed and chased from the table! This left the Parliamentary forces on the hill completely vulnerable.


My foraging units chose that moment to return to the battlefield, and were likely confused by the lack of anyone - Royalist or Parliamentarian - in the area. I started to send them after the Royalist cavalry.


But by then it was too little, too late. The Parliamentary infantry were flanked and, even after going into a "hedgehog" formation, were routed. With that, the Royalists rewrote history and claimed the field in the name of the King.

Ted was somewhat taken aback by the Parliamentarians' poor performance. We were done in just under two hours of what had been a four hour slot! But as my cavalry was so quickly wiped out, and the infantry couldn't hit the side of a barn from five paces away, the game was over rather quickly.

Even though the other Parliamentarian commander and I had some horrendous luck when it came to the card draws, we still had a great time. Like To The Strongest!, For King & Parliament is a fun, fast playing set of rules that looks good on the table.

As I mentioned in the post about what I bought at Cold Wars, I immediately went and purchased enough to start a small army in 28mm using Warlord Games' plastic and metal models. So while I supposed I've failed my "no new games" challenge, I've picked up another army to paint to completion!

Wednesday, April 3, 2019

Cold Wars 2019, Dogs of War vs. Dark Elves - Warmaster Revolution AAR

My last game was against Kal and his Dark Elves, who I had faced off against last year with my Ogre Kingdoms army. 


The last mission was Flanking Force. As the defender, I had to select four units and a hero to be a flanking force. Every turn, starting from the second, I would roll to see if the units and hero moved  onto the table from a predetermined short edge. Victory points would decide the winner (tallying the points cost of enemy units that were routed or damaged), and breaking the opposing army would provide a bonus.


My brigades steadily moved up, but were mostly waiting for the reaming units to arrive.

The Dark Elves advanced as well.


Luckily, it didn't take long for my flanking force to arrive!

However, I realized that I had chosen the wrong side to bring them on from, as Kal's most dangerous units - a brigade of dark riders - was all the way on the other side of the table.


I would need to deal with the pesky harpies in the Dark Elf army first, ast hey routed one of my crossbowmen in the fields.


My pike brigade was forced to wait as I made a personal blunder and completely forgot to order issues to my knights, leaving them on the side of the battlefield for another turn. However, my galloper guns were able to do some hefty damage to the oncoming witch elves.


I threw a unit of ogres deep into Kal's center, routing a unit of crossbowmen. In return, however, Kal's cavalry wiped out a two-unit brigade that was hoping to delay them.


In the center, a single stand of crossbowmen waited after being saved from the attacking harpies by a unit of dwarfs. The other unit of dwarfs had charged forward, also aiming to delay the oncoming elven spearmen.


And on the left, my knights finally got into the action, but only after the pikemen had done most of the work and taken horrendous casualties.


The knights congratulated themselves on a hob well done, as they ignored the grumblings of the lone remaining units of pikes.


The dwarfs were unfortunately rebuffed and pushed back, with the ogres and other dwarfs unable to help.


However, the game can to an end when the last mini-brigade of crossbowmen and marauders were charged, flanked, and wiped out, leaving victory to the Dark Elves.

This was a close game, and I may have been able to win if I had continued to refuse my right flank, and hadn't forgotten to bring my knights in sooner!

I had a great time, and really enjoyed all three games. We had more players in this tournament (eleven to last year's six) and we had plenty of convention attendees stopping to inspect our games and miniatures. Hopefully they'll attract more tournament players, as Dave plans to run another event at this years Fall In. I plan to be there!