Wednesday, December 14, 2022

Teste of Strength - Battlefleet Gothic AAR

This month's SJGA game was Battlefleet Gothic, run by John Stanoch (who, I will note, came up with all of the ships' names). 


John was using a modified version of Battlefleet Gothic Remastered, which is an ongoing project to update the Battlefleet Gothic rules and keep them available to new players. John's modifications included a grid-based movement system (which also affected weapons and ordinance) and a chit-draw activation system (combining a player's fire and ordinance phases into a single turn). 

The scenario was an ambush, set up by the Imperials by the theft of a Chaos artifact. With a Word Bearers fleet in pursit, it would be up to the Imperial players to pounce on the pursuing enemy fleet. 


The Chaos fleet was composed of:

Desolator-class Emperor's Testicle (Brian)
Slaughter-class Soulless (Brian)
Repulsive-class Bringer of Despair (Sam B)
Inferno-class Hellspace (Sam B)
Acheron-class Chaos Eternus (Phil)
Hades-class Injustice (Phil)


While the Imperial fleet was made up of:

Armageddon-class Hammer of Light (Robert)
Lunar-class Justicar (Robert)
Tyrant-class Zealous (Sam W)
Dauntless-class Abdiel (Sam W)
Dominator-class Hammer of Justice (Dick)
Dauntless-class Uziel (Dick)
Retribution-class Cardinal Boras (Tim)
Firestorm-class Gold 1 (Tim)


The Game started with a fell omen for the Imperial players. Robert failed his first command roll to order his ships to move "All Ahead Full". The Chaos ships, sensing an opportunity, passed their rolls to "Lock On" and mauled the Hammer of Light and Justicar.

Sam, realizing that Robert's lone ships wouldn't last much longer under such concentrated fire, moved his ships onto the table from the back edge, eschewing the optional rule to wait and deploy further up the table edge (5 squares per turn). 


The Justicar was the first Imperial ship to fall, becoming a drifting hulk. 

As Sam moved up and launched torpedoes, he was joined by Dick's squadron. 


There was a brief lull in combat as the Chaos Fleet was broken up, having to dodge between the waves of torpedoes launched by the Imperial ships. 


Seeing the formation scatter, Tim brought the intimidating Cardinal Boras in from the opposite table edge, accompanied by the single escort from Gold squadron that was included in the Imperial fleet. 


The Abdiel was destroyed when it was caught by a broadside of lances from the Emperor's Testicle

The Chaos Eternus and Soulless launched attacks against the Cardinal Boras, but the heavily-shielded battleship emerged unscathed from the enemy cruisers' attacks and set its sight on the grand cruiser Bringer of Despair. 


More and more Imperial ships were being destroyed, picked apart by weapons batteries and lances from the Chaos Ships. Caught between the Emperor's Testicle and Injustice, the Uziel was shattered. The Hammer of Light fled the failed ambush, moving to the edge of the system and opening a warp gate. Gold 1 was also caught by the Bringer of Despair and destroyed. 

Meanwhile, the Cardinal Boras moved forward, launching broadsides at the fleeing Chaos cruisers that unfortunately failed to connect. 

At the end of the game, the Cardinal Boras was the last Imperial ship on the table, with none of the Chaos ships having even been crippled, let alone destroyed. This ended as a disastrous ambush for the Imperium, and the losses would hinder the Imperium's effort in the sector for a long time. 

This fight was an uphill battle from the start for the Imperials, from Robert's bad luck at the start and their scattered approached to the Chaos battlegroup. This allowed the Chaos ships to dodge their torpedoes and pick the Imperial ships off one at a time. John also pointed out to me that the Chaos fleet likely had too many points for what was supposed to be an ambush. Potentially swapping out the Desolator for a cruiser like a Murder would make the Chaos fleet less likely to engage in direct combat. 

The only suggestion the players had was allowing a little more freedom in placing torpedoes. 


As they were, the torpedoes had very restrictive arcs that made it difficult to line up attacks. You could only place the torpedos either directly forward or to a 45 degree angle to either side. 


Allowing a player to give the torpedos an additional turn of 45 degrees to the left or right would give more freedom in direction, which would have given the Imperials a boost during the game. 

John's adaption of the rules to a grid-based system was fantastic. It took all the ambiguity out of movement and shooting, which made running a 7 player game relatively easy. I would absolutely consider doing the same for Castles in the Skies. John's game also reinforced my thought that less is more. Had each player been running 4-5 ships, this would have been a mess.

I'm looking forward to more Battlefleet Gothic in the future. 

Wednesday, December 7, 2022

Back to the Brawl - Regimental Fire and Fury AAR

Ted's game last week was a refight of Brawner's Farm, which we played a year ago using Pickett's Charge

This time we tried it with Regimental Fire and Fury. Which was great, especially since I haven't had a chance to play these rules for years. 


The setup was the same as the previous game, with the Stonewall Brigade and the Iron Brigade facing off already in musket range, with reinforcements coming on from the table edges. 

The battle started at 5:15, with daylight rapidly dwindling. This is reflected by line-of-sight dropping each turn once twilight hit (on turn 4, if I remember correctly) until units can only see by the light of the moon (8" in game terms). 

I was controlling most of Gibbon's units, while Steve had the artillery and one of Gibbon's units on the far right of the battlefield. He would take control of Doubleday's units once they arrived. 

Chip had Taliaferro's units, John had Lawton's, and Ted would control Trimble's troops. 


Chip had some awful luck at the start of the game, despite the Confederates getting the initiative. Between the Iron Brigade's effective defensive fire and the Stonewall Brigade's desultory offensive fire, it seemed like the rebels were on the back foot. I decided to press my luck and push my regiments forward. 


That luck didn't hold, unfortunately. Despite charging Chip's tiny regiments with my fresh troops, he chased off the Midwesterners. To add on to my troubles, the regiment that had charged managed to run low on ammo as they fired on the way in, leaving them at an early disadvantage. 

I also had John's regiments to worry about as they marched on my flank. 


And John happily pressed into that flank, combining his rifle fire with Chip's artillery to devastate one of my two regiments. 


Steve wasn't having a decent time either, as you can see. The lone Black Hat regiment he had was facing off against an entire Confederate brigade. And Ted's troops were dodging Steve's artillery fire as they marched forward. 


Caught between John and Chip, my regiments were quickly dwindling in size. Steve was rushing Doubleday's brigade up to stem the tide, linking up with my last Iron Brigade regiment that hadn't engaged yet. 


I did manage to push one of John's units back, and Steve sent his regiments to the far edge of the field to block the rest of John's regiments. Off in the far side, Ted and Steve were still engaging on either side of the swale that ran through the property. 

By this point, the light had dwindled to the point where both sides' artillery was useless. 


Two of my regiments were down to four stands or less, and one was low on ammo. Not expecting much from them, I was hoping they'd put up enough of a fight to allow my last regiment a chance to fall back and cover Doubleday's flank. 


Of course, that's when Chip received reinforcements. While they were tiny regiments, they were fresh, crack troops, and accompanied by a battery of horse artillery; exactly the weapon that the Confederates needed to pierce the beleaguered Union defense. 


Steve was managing to hold his own against Ted and Steve, but was hard pressed; there was a sea of grey and khaki that outnumbered the boys in blue. 


We ended up calling the game after turn six, if I remember correctly. The Confederates won a minor victory, having caused heavy casualties against the Union force and, had we continued, likely would have had enough troops to push the remaining Union troops out of the field. 

This scenario is definitely an uphill fight for the Confederates. The Union regiments are big and reliable, and not likely to shift unless the Confederates can direct enough fire against them. Discussing my choices with Chip and John, it may have been a better idea to, after Chip's opening volley had left my units unscathed, to fall back to the snake-rail fences and move into extended line, giving my troops a much better defensive stance and providing some cover from the Rebel artillery. 

Maybe this is something I can try if we play the scenario again. 

Wednesday, November 23, 2022

Counter Attack Orsha - Breakthrough AAR

My final game at Fall In was my only theme-centered game (this year it was "Vehicles of War: Trains, Tracks and Trucks"). The players would be taking command of Soviet and Russian forces during Barbarossa, with both sides clashing during the Orsha Counter-Offensive. 


There were four Soviet players (of which I was one) that controlled a division each, facing off against two German players with two regiments each. 

Our plan was to strike on the left side of the table where we had a distinct advantage in numbers, while the other two divisions would hold back a little longer. 


The Germans had the initiative and began to move out along the roads from town to town. 


Meanwhile, the German player on my side of the table roared forward to engage, leaving the Soviet forces on the backfoot. To prevent them from having an open access to the Soviet rear, the bridge on the nearby stream was blown. 


The Soviets had two problems to deal with: numbers and terrain. 

With so many units on the table, they could only squeeze so many men and machines in an area small enough to engage the Germans, which gave the Germans an advantage with their better stats. The river in front of my division also required an entire turn to cross, apart from the temporary bridge that an engineering unit set up. So when my troops were forced to fall back across the river, it took two turns to bring them back (and that didn't account for disruption markers gained from their poor leadership). 


Seeing that the left flank was stymied and holding on, the other two Soviet commanders charged their divisions forward, engaging the more strung-out German forces. 


A "turn" in Breakthrough represents 8 hours of real-time combat, so every third turn is a night (which I've represented through a vignette filter). Usually this is a good time to halt your advance and rally your units to prepare for the next day. 

Yet again, however, the Soviets were on the back foot. Our opponent had played a night fighting card (Breakthrough uses decks of cards for each national for some additional flavor that gives bonuses), and so could ignore the negatives of fighting at night. And as Soviets, we couldn't change our regiments postures from Attack to Defend, but had to shift to Reorganize first. Which would be fine, if there weren't two relatively fresh German regiments ready to pounce on any Soviet regiment that stopped its attack. 


I was pretty involved over on our side of the table so I wasn't entirely sure of what was going elsewhere. But from the picture, I see a lot more disruption tokens on the Soviet units than I see on the German. 

Notice, however, that the Soviet 17th Division had gotten a regiment of tanks over the river...


The dawn of the new day started with a German offensive directed at the command to my left. Through a series of absolutely incredible dice roles and some nerves of steel, the German attack was foiled by the Soviet player. This forced the Germans to fall back and, over on my side, move into a more defensive position and give me some breathing room. 


Through the open terrain on the other side of the table, the Soviets launched a new attack, forcing the Germans further back.


By the afternoon, both sides were fairly beat up on the Soviet left, and I had brought my reserve infantry regiment over the river to try and take the remaining Germans. 


But the real action was happening in the Center, where the 17th's commander had manage to surround one of the German regiments. Caught between two tank regiments, the Germans crumbled.

While the Germans had given the Soviet forces a beating and formed a decent defensive line, they were now split in half with the Soviets able to concentrate their forces as they wanted. 

We ran out of time here, and the game was declared a minor Soviet victory. Both sides were bloodied, but taking out an enemy regiment had given the Soviets a slight edge. 

Breakthrough was an interesting set of rules, and certainly the large "scale" of battle I've played yet. I think I'd like a second chance with them before solidifying my opinion. I did have a great time during the game, however, and that's what really counts. 

Wednesday, November 16, 2022

March of the Elephants - Age of Hannibal AAR

My first game of Saturday was a chance to play Little Wars TV's "Age of Hannibal" rules, which were recently updated to a second edition. 


The scenario was recreating the battle between Alexander the Great and King Porus of India, along the banks of the Jhelum River. 


Carl, who was running the game, had come up with a very clever pre-battle mini campaign to help randomize some of the game's setup. 

The two players commanding the Macedonian forces had to pick an area to cross the swollen Jhelum. Alexander's crossing was one of four king cards, placed at points A, B, C, or D. The Macedonians also had four noise cards, which represented Macedonian forces causing distractions. 

The Indian players (myself included) could use our lighter cavalry to scout Alexander's position. If we found him, the Macedonians would have to deploy first. But the Indian players also lost any units they used to scout the enemy's crossings. 

The Macedonians placed a lot of noise cards at point D, and a few at points A and B. We decided to have three cavalry units scout points A, B, and C, figuring that the noise at D was just a distraction. 

Our guess turned out to be right, and Alexander's crossing was revealed to be at point A (which included King Porus' camp). So the Macedonians set up first, and had limited cavalry reinforcements for the battle. 


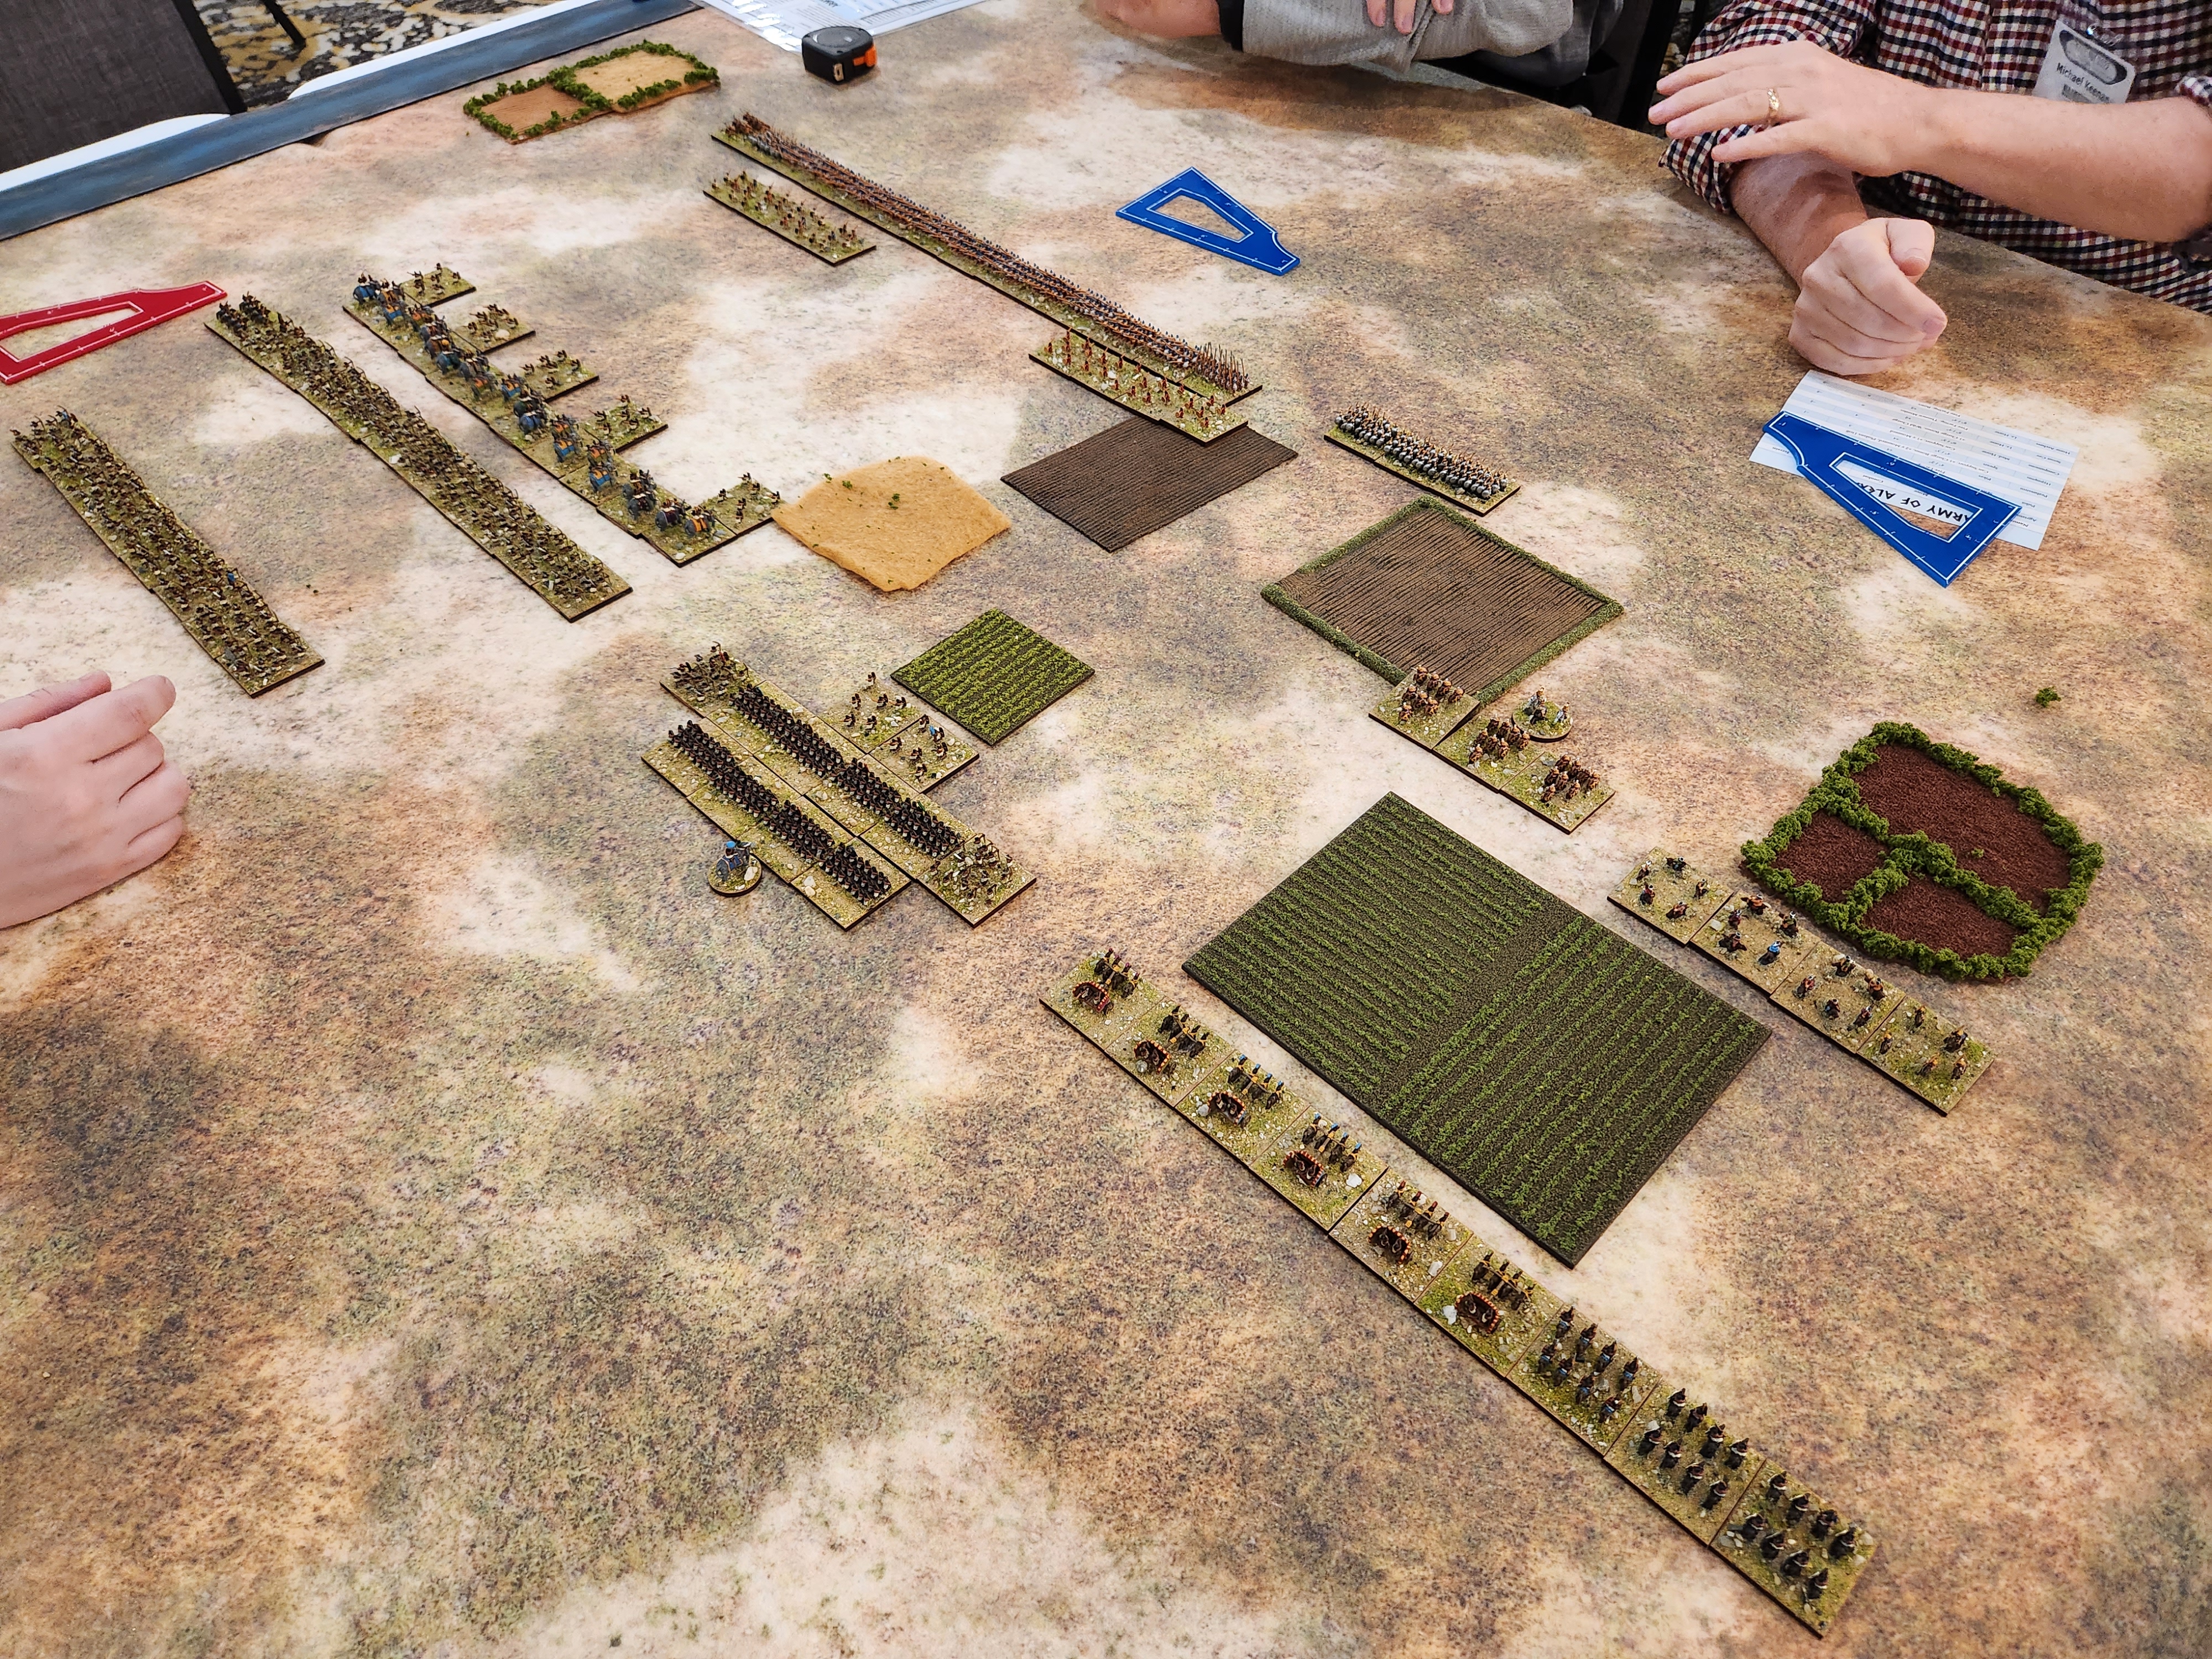
The battlefield was wide open with some fields scattered around that didn't impede the armies' movement. 

The Macedonians set up their phalanxes in a long, thin line, with the river anchoring one flank and the Silver Shield hypaspists on the other. Alexander took personal command of his Companion cavalry, and some mercenary light horse ended the Macedonian battleline. 

The Indians had more troops of lower quality than the Greeks. We set up our main force in three lines; the elephants, covered by skirmishers, followed by two lines of archers. A group of Indian nobles took up the center with Porus, while charioteers and mercenary cavalry squared up against Alexanders' cavalry. 


The two lines of infantry (and elephants) slowly ground towards each other, with skirmishers unsuccessfully exchanging javelins at range. 


The cavalry (which I was commanding for the Indians), however, quickly got stuck in, to predicable results. While the chariots had bows and charge bonus, their poor combat modifier meant that the Companion cavalry had a massive advantage in combat, especially with Alexander in command. 

At best, they would act as a roadblock while the mercenary cavalry moved in from the flank. 


Which they needed to do in a hurry as the Companions gave out DMZ tokens like candy on Halloween. 


The elephants continued to surge forward, crushing the Macedonian skirmishers without taking any damage and only slightly losing cohesion. 


And then, pachydermal mayhem!

The phalanxes were much stronger against the elephants than we reckoned, and while the first grey tide forced the Macedonian line to bow, it certainly didn't break. 

As any good ancients rules should, damaged elephants in Age of Hannibal panic and move randomly until they can be rallied. They can go anywhere; back into your lines, into the enemy's lines or, like we had, directly into each other!


And then, a miracle. A lucky die role saw Alexander captured after the Companion cavalry unit he was attached to was routed. 


If King Porus' army could hold out, Alexander's captivity could mean a bright future for his kingdom.


The first wave of elephants had pretty much petered out without much damage on the phalanxes, who could recover fairly easily thanks to their good morale. 

Worryingly, another unit of Companion cavalry seperated from the line of phalanxes and started moving towards Porus' camp with the intent of rescuing Alexander. 


The second wave of elephants charge in, with similar results to the first. Those phalanxes are tough! But at least the rampaging elephants between the two armies kept the Macedonians from advancing, and the Indians could launch arrows in the gaps.

The Indian lines began to shift with the hope of creating a shooting gallery that might stop the Companion cavalry from getting to their commander. 


In the center, the Indian nobles clashed with the Silver Shields. While the Macedonians were better trained (like everything else in their army), the Indians had the numbers advantage. 


Unfortunately, it wasn't going well for my commands. Even surrounding the Companion cavalry couldn't stop them, and I was collecting DMZs left and right. 

The fight between the nobles and Silver Shields was a little more even.


With most of the elephants rampaging, the Indian archers tried to keep clear and sent volleys of arrows into the ranks of the Phalanxes. 

On the riverbank, the last Indian mercenary cavalry unit frantically chased after the Companion cavalry.


In Age of Hannibal, once an army's morale clock (which also determines how many moves their force can make) gets down low enough, they have to give out a number of DMZs to units on their side. 

We had quite a few, and used them to remove the elephants from the table, reasoning that they were as likely to charge into our lines as the Macedonians. 


However, the Macedonians were just as bloodied and also on the verge of collapsing. I managed to knock out another unit of Companion cavalry and brought in a fresh line of nobles into combat with the Silver Shields. The Companions along the far back were also caught by the Indian cavalry and took a hit in combat.

With time running out, Carl decided to call the game here. Both sides were battered, but Alexander's capture had tipped the scales in the Indian's victory. 

This was another great game. ADLG had put me off of non-grid based Ancients rules, but Age of Hannibal has brought me back. I will pick up a copy of the rules for my collection, and I could imagine using these if I wanted to start a Successors campaign with some other willing players.