Showing posts with label AWI. Show all posts

Wednesday, August 23, 2023

All Systems Greene - Washington's Wars AAR

I not only attended this month's SJGA game, but also helped to run it. Major kudos to Ryan who not only also helped to run the game but painted 120+ miniatures in a short period of time, and to Sam for providing his collection for us to use as well. 


Sam had requested earlier in the year that we run a game using the rules "Washington's Wars", which were published back in 1993 - two years after I was born. 

The rules have a few scenarios in the back, one of which was Guilford Courthouse. Sam's collection has both Tarleton's Legions and Washington's Cavalry, and Sam had an ancestor in Washington's unit. So we decided to use that scenario for our game. 


The British players started at one end of the table, consisting of:

General Cornwallis
General O'Hara
Colonel Webster
von Bose Regiment
71st Foot
23rd Foot
33rd Foot
1st Battalion Guards
2nd Battalion Guards
Grenadiers
Light Infantry
Legion Cavalry
Jagers
Artillery (2 Light guns)

Their goal was to rout or capture three of the four Continental regiments. 


The American were deployed in three lines, spread out along the table length:

First Line
General Greene
1st North Carolina Militia
2nd North Carolina Militia
North Carolina Riflemen
Virginia Riflemen
Artillery (1 Light gun)
Second Line
1st Virginia State Militia
2nd Virginia State Militia
Third Line
1st Maryland Continentals
5th Maryland Continentals
4th Virginia Continentals
5th Virginia Continentals
Washington's Cavalry
Artillery (1 Light Gun)

Their goal was to cause more casualties than they lost. They would need to have the four Continental units engage before being allowed to begin a general withdrawal. 


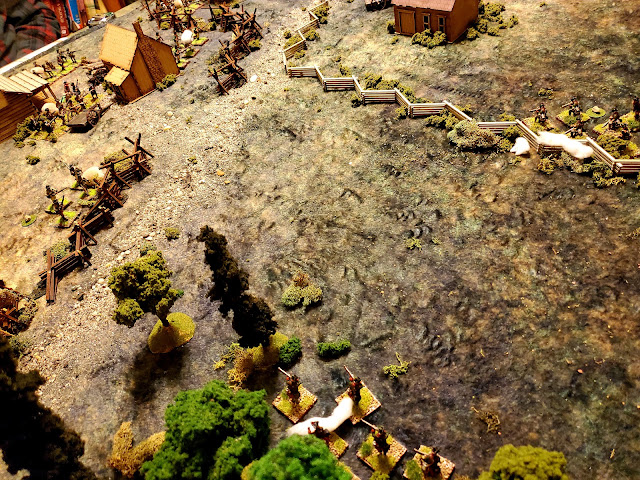
The British stepped off together, but their approach was stymied by the American riflemen. The large, 16-man Virginia rifles were especially dangerous, causing relatively massive casualties early on.

However, the rifle's poor morale meant that once the British were in musket range, they were very likely to run off, leaving their defensive positions behind the fence line.

The British did have better luck with their artillery, quickly knocking out the lone American gun. 


One of the rules changes we made (since the rules were designed for 15mm miniatures and we were playing in 28mm), was making the reserve movement double instead of one-and-a-half times a unit's movement. 

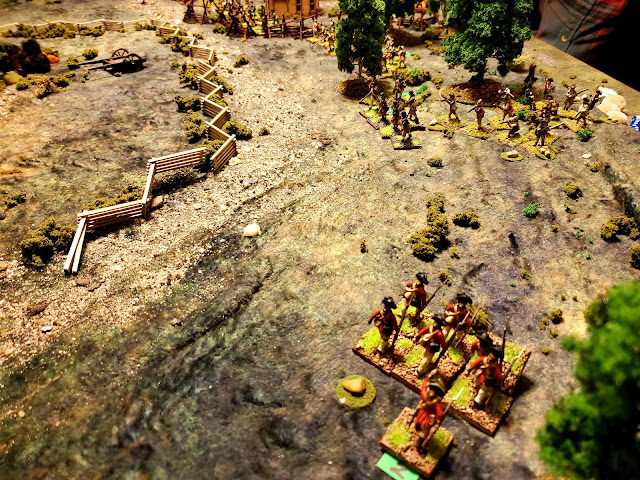
This allowed the Americans to bring up their reinforcements somewhat quickly. Sam was in charge of the Continentals and charged Robert's Legion cavalry. The Legion had the better time of the fight and forced the American cavalry back.

Unfortunately, Robert then followed up with a countercharge. He did force Washington's cavalry to retreat, but that led him into range of a point-blank reaction fire from the accompanying Continental infantry. The bonuses for short-range and First Fire was enough to wipe out Tarleton's unit. 


On the British right, the Americans were in full retreat, hurriedly trying to reorganize their lines before the British could get to close. 

British long-range fire peppered the American lines, causing casualties but not forcing them back. 


With both cavalry units rendered ineffective through casualties, the Prussians and Continentals faced off, exchanging volleys. 


With the Continentals double-timing, and some well-timed volleys from the Americans, the British advance was checked. This gave the Americans enough time to shore up their lines.


Further combat on the American left saw losses on both sides, with the British continuing to advance. On their right, the British had halted their advance. 

Unfortunately, we ran out of time. But the Americans had battered the British, with the Redcoats losing twice as many casualties. With the Continental units almost untouched, the Americans could put a feather in their cap and ride off calling it macaroni. 

Washington's Wars, for being a dinosaur compared to other wargaming rules, turned out relatively easy to play. We did have to talk out some of the rules (like some sections on the reference sheet missing in the rulebook, or lacking clarification), but it wasn't a bad time. And I'm happy that we managed to get 7-8 people playing. 

Between Ryan's and Sam's collections, the club should be able to put this game on again if they want to tweak any of the changes to the rules we used. 

Wednesday, March 9, 2022

Leadership Skills - Sharp Practice AAR

This past week's game at Ted's was my first opportunity to play Sharp Practice. It's one of those rulesets that you hear a lot about in the historical side of the hobby; usually in terms of endearment or revilement. 

This was the second time Ted was running this scenario. The previous week's game used Muskets & Tomahawks, which I missed. The overall opinion of the rules weren't great, with the players saying it felt clumsy and took too long to go through. 


The scenario was set early in the American War of Independence, with untested American Continentals and untrained militia squaring off against a combined force of British and Hessian infantry. 

Ted was gamemastering for us. Chip and Steve commanded the Americans, while John and I played the British and Hessians, respectively. 

Unlike the Muskets & Tomahawks game, where the two sides fought over an arbitrary set of objectives, this was a straight-up fight with both sides aiming to reduce the others' morale. 


Chip's militia were the first to filter onto the table, making their way past a couple small buildings. 


John's British came on at a brisk pace in a formation of three groups. 


At the end of the first turn, the battlelines were starting to form. The Americans were moving through the woods as the Hessians tried to catch up to the British on the far side of the farmstead. 


My Hessian Jaegers were the only rifle-equipped units on the table, giving me a range advantage (with a rate-of-fire disadvantage). 


John ordered his Regulars to hold and aim, waiting for another turn to hit the American skirmishers with a volley. 


And my Jaegers continued to be a nuisance, with Chip losing one of his Big Men from their rifle fire. 


John's initial volley looked spectacular (with a lot of dice!) but failed to do much damage. 


My Jaegers continued to trade fire with Chip's infantry, although I was more nervous at the number of militia approaching from the distance. 


One quick turn ended with a house suddenly catching fire! Maybe it was an unattended fireplace, or maybe a jostled candle?


To Chip's frustration, my Jaegers wounded another of his leaders, leaving the American's right wing stalled with no leadership. 


While Chip's flanking maneuver was halted, the Americans did have a decent line that forced the British and Hessian fire to be spread out instead of hitting single groups. This helped keep the Americans in the fight despite the initial morale losses. 


And they would need the help! John's invincible light infantry seemed untouched, despite a hail of lead fired from the Americans. His Regulars split into two groups, one moving to flank the militia in the woods. 


This would see the main battlelines form, with the Americans taking cover in the treeline and the British firing from within the farmstead. 


The Hessian Grenadier and Fusiliers finally managed to get into the fight, but the distance, light cover, and numbers of American militia saw the damage spread too thinly to have an effect. The Hessians didn't take any casualties from return fire, but started to accrue Shock. 


John's redcoats were taking a beating from the militia. Sharp Practice doesn't seem to differentiate much between the shooting abilities of militia and trained soldiers, apart from being able to take certain actions like 'Present' or 'Sharp Practice.' This means a horde of poorly trained troops can still put the hurt on trained troops, as Steve was able to do. 


For several turns, this is how the battle looked. The Americans had formed a decent line with their militia horde, while the much patchier line of British and Hessians were managing to hold but taking casualties. 

Chip's wounded leader on the far left recovered and gave the Jaegers a terrible blow. Between that and a 'Dampened Powder' random event, the Jaeger unit was effectively useless. I had to pull them back, rather than let them take any more hits and risk a loss to our side's Morale. This left the flank open for Chip to advance. 

Steve's militia also finally managed to hit the Light Bobs, forcing John to start withdrawing the group lest they also be lost.


However, with how John was rolling (see above; in Sharp Practice, rolling low saves lives), the British seemed invincible! Just ignore the casualties off to the side of the table, there. 


Another random event forced John's flanking group of British Regulars to charge towards the American lines. If they had gone just an inch further, it may have gone badly for the outnumbered redcoats. 

After a few more exchanges of fire, and at the primping of the assembled players, Steve ordered his Militia to charge into the isolated British group. 

In an unexpected turn of events, the British gave better than expected and the Americans ended up fleeing. 

We decided to end the game there as it was getting late. While the British were currently in the lead (8 morale points to the Americans' 5), had the game gone on for longer it may have swung the other way. As I mentioned earlier, the Americans had the greater number and could both put out more shots and spread return fire out through there lines. 

This was a great scenario to learn the rules, so I'm looking forward to playing again, hopefully with some more space to maneuver or with different objectives. But overall, this is yet another win for the Lardies when it comes to writing fun rules that I enjoy. 

Wednesday, December 8, 2021

A Hill to Die On - Live Free or Die AAR

With Thursday and Friday done, I arrived once again at the Valley Forge Casino for a day's worth of gaming.


The morning game was a refight of the Battle of Brandywine, ran by the Little Wars TV crew. I'm a huge fan of their on-going, fantastically produced battle reports on Youtube, and I jumped at the opportunity to get into one of their games as soon as the convention registration opened. 

I was especially excited because it was an opportunity to play their new set of rules for the American War of Independence, Live Free or Die

Before the game began, the British Commanders (myself and Walt) were presented with a couple choices. We had the chance to rest our troops before engaging, which would cost us a couple turns but give us the ability to remove morale hits (DMZs) at the end of a turn. We could also send a flanking force to try and cut the Americans off on another table which was centered on the small town of Dilworth.


We decided to rest our troops (which gave us 10 turns to complete the objective) and send a small brigade of two Guards regiments to outflank the American position. 

Walt controlled the majority of the troops with Cornwallis' and Medow's Brigades, while I had Agnew's and von Donop's brigades. 

The American players (Zach and Ray) had loaded most of their troops on their right to block the road under Zach, while Ray's troops were positioned to block my own. 


The British advanced towards the Americans who, apart from some slight shuffling, held their ground. 


With the Americans angled on the hill, it took several turns of marching before my troops could get into firing range. 


Zach and Walt, on the other hand, clashed immediately, with Walt's troops fixing bayonets and charging up the hill. 


Ray's position on the hill meant that my regiments had to cross multiple obstacles to reach him. Doing so gave my units a DMZ per obstacle crossed. 

I planned to give Ray's troops a round of firing before charging in. 

Live Free or Die is also a shoot-then-move ruleset, and units that don't plan to move can "volley fire," doubling the amount of shots they get. 


The British got the worse of the exchange of volleys, with multiple stands lost and units forced back down the hill (which meant I would have to cross the obstacles once again!).


Meanwhile, the Americans must have gotten word that some force of British was moving on a flank march, because their entire right flank suddenly about-faced and started marching back towards Dilworth.


With his flank in the air, Ray decided against retreating his own troops and instead planted his flag and stood his ground. 


Walt, on the other hand, was chasing after the treating Americans. 


The fighting was fierce between the remaining British, Hessian, and American troops, and ownership of the hill was fluid. Both sides were gathering DMZs like they were on sale.


Walt's path was open, so he split his advancing troops into two forces; one was sent after the retreating Americans, while the other was gathering to push into Ray's flanks. 


Despite being outnumbered, Ray's soldiers stood firm in the face of the Hessian Grenadiers, and sent the whole brigade fleeing backwards when I failed multiple morale checks. 


Despite multiple pushes, I couldn't seem to get my regiments to form a cohesive attack on Ray's position. 


By this time in the game, most of the left side of the table had been completely emptied. 


And the Americans were gathering at Dilworth. 


Now flanked by Walt's troops, Ray wasn't going to do down without a fight, using his skirmishers and last, tattered regiments in a curved line.


However, a combined charge by British regiments saw the last American troops on the hill routed. 

The game ended with Walt's flanking troops advancing on the Dilworth table, but too far away to keep the Americans from consolidating their position. 

The game ended with a somewhat historical result; the British ended up taking the American positions but were unable to stop the Americans from retreating in relatively good order. It had been a much bloodier refight, though, with both sides taking far more casualties than in the original battle.

Given another chance, I probably wouldn't have bothered with letting the British troops rest for two turns in exchange for access to the "Redress Ranks" phase. The cost of losing the extra game time wasn't worth the benefit of removing DMZs, since you have to be outside of 12" of enemy units to do so. That was on me - I convinced Walt to delay the advance rather that immediately step off. A couple more turns may have made all the difference!

This was a fantastic game and one of the best convention games I've participated in. The miniatures and terrain looked fantastic, and I'm absolutely planning to use Live Free or Die as my go-to AWI rules. It looks like I'll have some orders with Pendraken in the next year.

Wednesday, September 8, 2021

The Battle of Monmouth, Part 2 - British Grenadier AAR

This past weekend, the group finished up the Battle of Monmouth started the previous week at Ted's.


Unfortunately, Chip was a little under the weather and couldn't make it, so it was up to me to command the entirety of the British facing Ted's and Steve's Americans.

It started out with a failed charge with a combined regiments of Grenadiers and my pulling back of the Light Dragoons (which would be an error I would rue for the rest of the game.

One of my artillery batteries also broke and ended up fleeing from the battle. 


On the British right, however, my original command was doing well against Steve's defending Americans. While another combined brigade was rushing to reinforce the colonial forces, my skirmishers moved up to continue to plug away and cause casualties. 


As Steve's infantry was forced back, his cannons stopped their retreat and unlimbered, just in time to catch the Queen's Rangers who had planned to run down the American artillerymen!


While the Grenadiers stalled in trying to oust the entrenched Americans, the artillery finally got their range and blasted Ted's cannons out of place, with some help from a small unit of British skirmishers. The Americans promptly fled before they could be rallied.

Meanwhile, the Light Dragoons were making a break for the American rear, weathering the artillery from the American brigade on the hill, just out of shot. 


Steve's brigade continued to hold the British back, but the weight of fire was deadly and the American's couldn't return enough fire to dissuade the attack. The Queens Rangers had managed to scoot around the guns, but ended up blocking a number of shots from the skirmishers. 


The American's could definitely put a feather in their cap when the Grenadier regiment broke and fled! This left a worrying gap in the British line, and threatened the flank of my second combined Grenadier regiment. 


The end came before the American's could exploit the absence of the Grenadiers, however. Steve's brigade broke and collapsed, leaving the American left flank open to a relatively fresh British brigade. 

Both sides decided to withdraw, as the British rearguard had succeeded in spoiling the American attack. 


Ted's brigade on the hill overlooked the American right flank. The Dragoons were just within range of another shot. If I had pressed them forward from the start of my taking over their command, I may have been able to threaten the larger artillery battery in the American center. 


Meanwhile, the Foot Guard troops had positions themselves to hold the center. They were stubbornly difficult to get rid of, although one regiment had suffered a number of casualties between Steve's infantry and Ted's cannons. 

All-in-all, it was a fun conclusion to a great game. There was a discussion afterwards between Steve, Ted and I as to how the game may have gone differently. One suggestion was for Steve's brigade to abandon the farm and retreat to the hill to combined with the arriving reinforcements, instead of trickling into an ongoing fight in a position the British could flank. But as Steve pointed out, that would have left Ted's command vulnerable, and cede a larger amount of the battlefield to the British that the Americans would then have to fight to retake. 

Hopefully we'll get a chance to replay the game and test those theories.