Wednesday, June 8, 2022

'Advance' to Hill 192, Part 1 - 'O' Group AAR

We've continued to play 'O' Group at Ted's, slowly mastering the set of rules as we try different scenarios with a variety of forces. 


This time, Ted set up a scenario from the "1944: The Battle for Normandy" booklet, "Advance to Hill 192." 

This scenario sees an American infantry battalion attacking the town of Saint Georges d'Elle, which is defending by a worn battalion of German paratroopers. 

Unlike other scenarios, the BUAs that make up Saint Georges d'Elle are strung out separately as seven individual sections. To achieve victory, the Americans have to cause 3 FUBARs to the Germans within 18 turns. If they can't, then the Germans win. 

Ted, Steve, Chip and John had already plated another version of this scenario, with a worn American paratroop battalion defending against a German attack. Apparently it went rather quickly, with the American's under Ted's command folding quickly against the German blitz.


Chip, Ted, and I took command of the Americans. I had the center company with Chip on my right. 


Ted had the left flank. 

The Americans advanced with a mix of infantry platoons and combat patrols, moving quickly and hoping to find where the Germans had taken up their defenses. 


We didn't have to wait long. Steve revealed a number of hidden platoons, opening fire on the Americans. There weren't any losses, but Steve was happily handing out plenty of shock to the American platoons. 


I brought on another infantry platoon to assist Ted's attack on the left flank, and Ted received the first of two Sherman platoons that were assigned to the battalion. 


Chip's main effort was attacking the remote farmstead that was defended by a German platoon and an attached machine gun. With one platoon moving to take cover in a copse of trees, Chip sent out two combat patrols to further surround the objective. 


That quickly turned into the largest engagement on the table, as both sides deployed infantry platoons in support. Steve had two platoons against four American platoons (Chips' entire company and my last deployed platoon).

Unfortunately, even with a double set of re-rolls, the Americans failed to call in a potentially game-changing divisional artillery bombardment to soften up the Germans. 


On the American right, Ted was busy dealing with a StuG that had turned up along the road bisecting the table. Not wanting to expose the Shermans, Ted instead opted for the integral AT weapons in the infantry platoon taking cover in the orchard. Unfortunately, it couldn't make the range and missed. 


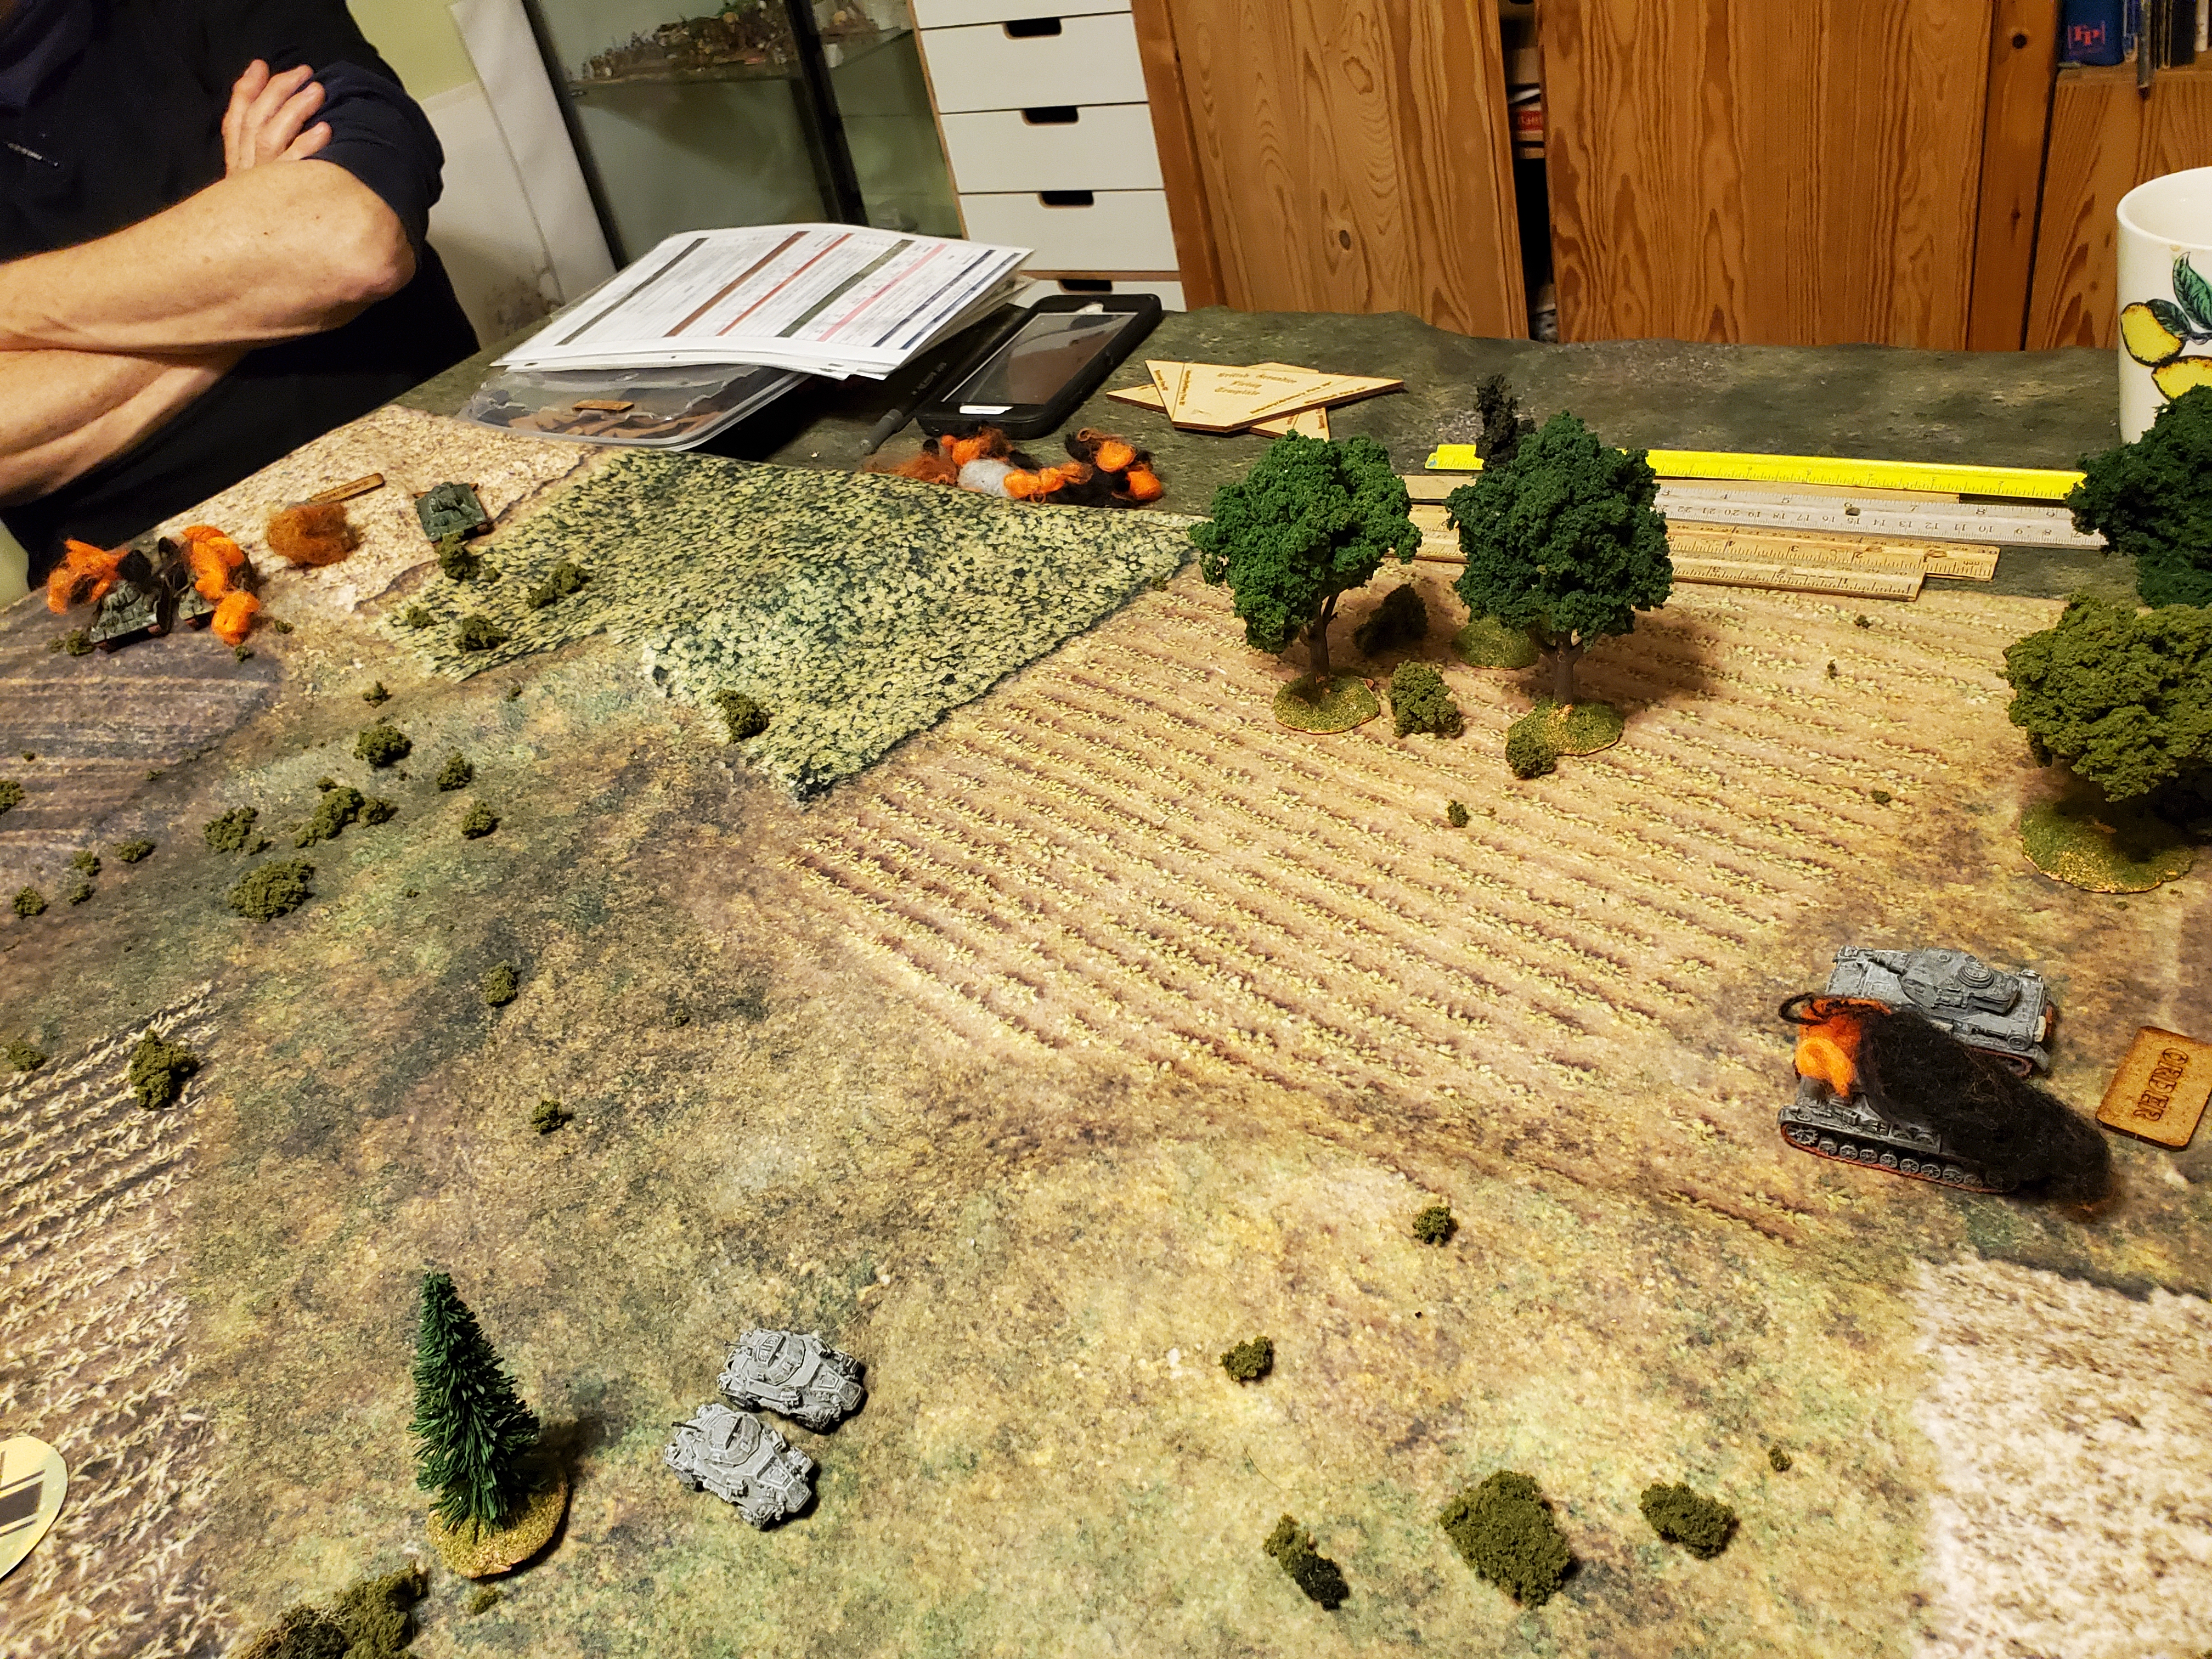
This was the table about halfway through the game. 

The American advance had stalled, as the Confident German infantry was difficult to shift.


I had made a mistake when deploying an infantry platoon to support Chip, which gave Steve an excellent chance to deploy a platoon into the BUA on the close side of the road and mow down the American platoon. 


Ted's infantry had been forced to fall back, and one of his own platoons had similarly been reduced to a lone section. 


Chip, however, was doing the necessary work and assaulted the farmstead, slaying the defending German platoon and routing the other platoon which had deployed in support. 


Ted could also count a victory, with his AT gun knocking out the StuG, which gave his Shermans the opportunity to advance. 

A lucky round of rolling saw one of Steve's platoons retreating. This ended up being a boon for him, however, as it meant that the Americans couldn't put more hits on the platoon and try to knock out more sections. 


With the farmstead secured, Chip diverted his platoon of Shermans to assist with knocking out the Germans that were pinning down my platoon. 


The left flank had remained fairly static, with both sides trading fire. 

We ended the game on turn 11. The Germans were down 6 sections, while the Americans were down 9; a fairly bloody battle that had seemed pretty peaceful in the first half. 

We'll continue the game this upcoming weekend, and it seems like it could swing either way. The Germans are halfway to losing the necessary 12 stands to end the scenario, but Steve still has reserves left that could hurt the American troops. The Americans have been beaten up, but they still have their tank platoons in good order. They need to be wary of German anti-tank weapons, but they've got the superior range to anything the Germans currently have deployed. 

So we'll see how this ends next week!

Wednesday, June 1, 2022

Painting Update - Mythic Americas

Unfortunately due to some unforeseen scheduling mishaps, I wasn't able to get any games in over the long weekend, so I'm back with another painting update. 

Apparently Mythicos Studios is planning a Mythic Americas tournament at Historicon this year. I wasn't going to go, but I could see myself getting a single day admission ticket and heading over to Lancaster for this event (if attendance seems like it'll be high enough). 

Over the past year, Mythic Americas has seen the addition of the Inca and Maya factions, and I really wanted to put together a Maya warband. I started with the Ah Kin Priestess as a test model for skin tone and faction scheme (teal, purple, and orange). 


It also helps that the Priestess is accompanied by models from another Maya unit; Alux Swarms. Pronounced Aloosh, these tiny statues were inspired by Maya legends of mischievous spirits. They use "Insults & Trickery" as their in-game weapons, causing Pins instead of Wounds. 

Wednesday, May 25, 2022

Painting Update - Dieselpunk, Ancients, WW2 French

Let's take a break from the battle reports and take a look and what I've painted since the last update. 


I finished up the rest of the dieselpunk tanks. I went for a pea-dot camo pattern for these larger tanks. 


They're great looking tanks, inspired by Ghibli movies; rounded edges and bristling with guns. 


This larger tank got a simpler camo scheme, as who would really bother trying to hide a tank the size of a house? 


Speaking off, I also finished a set of 6mm houses. These were 3d printed and intended for ACW gaming, but they should work for any small scale wargaming that needs generic houses for built-up areas. 


I also finished my Pontic force for Strength & Honour. 

The Pontic army lists has some of the same infantry types as the Romans (Skirmishers and Imitation Legions), but they're one of the few factions in the rulebook that still use the Pike Phalanx (the others being Eastern Client Kingdoms and Armenians). I had an interesting time creating the pike effect, by combining drybushing on the resin unit base and painted brush bristles to imitate lowered pikes. 


Unlike the Romans, the Pontic army makes much more use of cavalry, like the above Cataphracts. 


They also have options for Light Horse and generic Cavalry.


And they can even take Scythed Chariots!


With all of my 2mm Ancient painted, I decided to move on to a new project - 28mm WW2 French. 

Usable for a variety of rules (most likely Bolt Action and Chain of Command), this platoon and accompanying support units will be an excellent opponent to the Germans I painted for the Polish campaign that the SJGA ran last year. 

Ultimately, I'd really like to be able to use these to play out the "Taking the Gembloux Gap" campaign from TooFatLardies. I would need to add some more armor to both sides, but the infantry should cover most options needed. 

 
The French have an interesting platoon organization; 12-strong squads, each equipped with a light-machine gun and a rifle-grenade launcher which can be seperated out as a separate squad (at least, in Chain of Command). 

Wednesday, May 18, 2022

'Crowning' Achievement - Strength & Honour AAR

This past weekend was Kozcon, a small mini-convention put on by a group of wargamers from Pennsylvania in memory of a friend and fellow wargamer. The ticket costs are donated to the American Cancer Society. 

It was a well attended event with over two dozen players. There was an ADLG tournament (28mm open) along with several other participation games. The main event was a dice-off raffle with plenty of prizes. 

I met up with Ted and Steve, who had agreed to play our first game of Strength & Honour at the convention. I had just finished the Pontic Greek army a few days prior.

Another attendee (Russ) dropped into the fourth player spot alongside me as the Pontic commanders. Steve and Ted led the Romans. 


As to not complicate things too much, we kept the terrain and scenario simple; a good ol' brawl to test the rules. 

The Roman force consisted of:
    x1 Veteran Legion  
    x3 Experienced Legions
    x2 Raw Legions
    x2 Skirmishers

The Roman Legion in Strength & Honour is a big, tough block of troops. Even the Raw Legions can put up a decent fight, and the Veteran (and Elite) Legions are implacable, deadly, and relatively nimble for formations of around 5,000 soldiers. 

The Pontic army was much more varied:
    x2 Pike Phalanxes
    x1 Thureophoroi
    x2 Imitation Legions
    x1 Skirmishers
    x1 Pontic Cavalry
    x1 Pontic Light Cavalry
    x1 Cataphracts

As one of the few Successors factions in Strength & Honour, the Pike Phalanx takes front and center in the Pontic force; that is, as long as they're not trying to copy Rome with their Imitation Legions. They also had access to cavalry for this game, something Russ would use to good effect. 

We also calculated break points, with the Romans having 17 and the Greeks having 18.


The Romans won the roll off to be the attackers. Their skirmishers moved forward as the Legions began to spread out. The center of the Pontic line moved up, with the flanks staying still. 


The first two units to clash were the Pontic Thureophoroi and Roman Skirmishers, which only resulted in a push back. 

We quickly found out that Skirmishers are a headache to deal with. You need a 6 on the Combat Dice results to really do any damage, and if the opponent can pass their Discipline Tests (which Steve did with flying colors), then you can't give your opponent any Setback cards by pushing the Skirmishers back.


I realized my deployment mistake early on, when Ted's Skirmishers managed to push back my Cavalry from their woods. This left the right flank of the Pontic line up in the air; the worst possible situation for a phalanx!


It didn't take long for both sides to push their attacks on the enemy flank. The Romans had their Skirmishers, who had to contend with the Pontic Cavalry. However, because the Skirmishers were in partially in rough terrain (the small woods scattered around), both sides Combat Rating were greatly reduced, and the Cavalry wasn't able to do much. 

On the other side of the battle, the Pontic Light Cavalry and Cataphracts were lining up an attack on the Veteran Legion. 

The Thureophoroi managed to push back the Roman Skirmishers and the unit was Disordered. 


As the battle raged on, I was desperately trying to stop Ted's Skirmishers from getting into the flank of the Pike Phalanx, but failed. This is especially bad for Phalanxes, as they automatically become Disordered when attacked on the flank. Not only does this result in a Setback Card, but it's only a single step away from the unit Routing!


Meanwhile, Russ was pinning down the Roman flank with the Cataphracts. But with the Veteran Legion's Discipline of 5+, they weren't going to be panicking any time soon. 

Unfortunately, the Pontic Light Cavalry bounced off the flank of the Raw Legion that had failed to move the entire game and became Disordered. 


I wasn't so lucky with my forces. The first of the Pike Phalanxes routed, and the Thureophoroi were pushed back by a Raw Legion, becoming Disorded as a result. I was picking up Setback and Disaster cards left and right!

It was around this time that Steve and Ted called "Haemonculus Est!" to see if the Pontic army had broken. Luckily we only reached around 11 of our 18 break, which let us discard one of the Disaster Cards, but Fatigued the Pontic forces, reducing their movement for the rest of the game.


Despite continually hitting their flanks, my Cavalry couldn't seem to do any damage to the Roman Skirmishers! This meant they were free to hit my second Pike Phalanx in the flank and, with some poor luck, quickly routed the unit. 


Russ' Cataphracts continued to hammer the Veteran Legion, and for a moment the gods shined on the Pontic forces as the Legion failed its discipline test with a critical failure, resulting in the Legion retiring and ending up Disorded and  facing away from the Cataphracts. 

That luck didn't last long, however, with the Pontic Light Cavalry not only failing to reform, but instead dispersing with a Rout result.

Both sides continued the fight, but a second call of "Haemonculus Est!" from Steve and Ted revealed that the Greeks had finally crossed over their break point, which ended the game. We tallied up the Setback and Disaster cards; the Greeks had 23, while the Romans had 10. It would have been a little higher had the Romans not rolled box-cars twice on two separate Discipline Checks (which allows you to remove an unseen Setback card).

The vagaries of Fortuna aside, we really enjoyed the rules! 

One aspect of Blood Bowl (I know, hold on, stick with me for a moment) is the calculation of risk when activating players. There are some actions that are less risky than others; standing a player up should be done before trying to tackle an Ogre with a lineman, or trying to dodge past a member of the other team. 

Strength & Honour scratches that same itch. It's a balancing act of trying to determine what's the least risky activation first. It's recognizing when you should slide that unit of skirmishers up to support a combat so it's two dice, your choice, instead of a single die roll. 

You add that to a fun period of history and a relatively niche scale, and it's a blast. I'm going to be ordering extra units soon so I can run bigger and more varied games. Maybe I could even get a campaign going. 

Wednesday, May 11, 2022

Highway to Hell, Part 2 - 'O' Group AAR

This past weekend, we continued the "Highway to Hell" scenario that Ted had left set up in his game room. 


We got through 7 turns of a possible 18 in the first part. The Germans had approached Voin with only a single stand lost, but hadn't managed to cause any damage to the Soviet defenders yet.  

John joined us for this game, so he took command of the Soviet T-34 platoons that Ted had brought on at the end of turn 7. 


In response, I called up the German's remaining anti-armor reserves - an 88mm and a platoon of Panzer IVs. 


One T-34 brewed up from the German fire. 


And as was expected, the Soviets concentrated their fire to quickly remove the 88mm from play before it could do any real damage. This had happened in a previous game as well. The iconic artillery piece is something of a fire magnet, and doesn't have a chance if it's not in a well defended position. 

Unfortunately, as the attackers, Steve and I didn't have much of a better choice as to its deployment. If we were playing again, I would maybe try to tow the gun into one of the small forests on the edge of the table, but I wanted the elevated range that the sides of ravine offered. 

In return, another T-34 was knocked out by the Panzer IVs. 


The standoff in front of Voin continued, with the Soviet mortars hammering the infantry platoons in the woods. A shot from one of the Soviet anti-tank guns destroyed a Panzer III. 


After what seemed like an incredible series of dice rolls, the Panzer IVs ran out of luck. There was only a single T-34 left, but the Germans lost a Panzer IV. 


And I lost my last Panzer III from some accurate fire from the Soviet defenders. From four tanks to just one in a couple turns! At least the Soviets were also quickly running out of armor. 


Or so we thought. As Steve moved his tanks forward towards the objective, a pair of BT-7s fired from their ambush position.


The light tanks weren't too much of a threat, however, and return fire from the Panzer IIIs knocked one of the BT-7s out. The second BT-7 didn't last much longer. 


Earlier, Ted had sent one of his company commanders out to try and give the T-34s more orders (CC's have an 18" command range). Not wanting to let such a valuable target go, I sent a platoon of 221's after him. With a 2+ save and my terrible dice rolling, I only managed to suppress the commander and couldn't kill him. While this still led to some 'command crises' events (a fun little guessing game that can result in HQ Order losses. 


At about two-thirds of the way through the scenarios, both sides were relatively battered. Both the Soviets and Germans had at least one FUBAR, reducing their Battalion dice. 


With the long duel between the remaining Panzer IV and T-34 ending with the German tank knocked out, Ted and John decided to focus on the 221 platoon, deploying a couple infantry platoons with attached anti-tank rifles to surround the armored cars. In response, I deployed one of my infantry platoons and returned fire. 


After a couple turns of exchanging fire, the Germans were worst off, losing an infantry stand and one of the 221s. 


And there were more losses on the other side of the battlefield, as the Soviets lost an anti-tank gun and some infantry, and the Germans had an infantry platoon reduced to a single section.

At that point we called it a night at the end of turn 15. The Germans had lost 8 sections and the Soviets had lost 9, so two FUBARs for both sides. In order to win, the Germans would need to remove three more sections from the Soviets in as many turns, otherwise the Soviets would win. 

We decided that the game ended in a draw, with a slight edge to the Soviets. While the Soviets were close to breaking, the German offensive was pretty much blunted, with much of its ability to attack removed with the loss of the tanks. If the Soviet infantry platoons fell back out of range of the German infantry, the Germans would need to advance into the open to try and remove those last sections; a deadly proposition in the face of the still well-defended Voin. 

Still, it was a fun game and a good scenario. I can see how it could have turned out differently in several ways; if Ted's delaying action had worked, or the T-34s or Mark IVs had survived. 

This scenario is, however, much like the basic scenario in the rule book (the "Assault on Cristot"), as it's an attack on a defended set of BUAs. Ted and I chatted about trying out a scenario somewhat inspired by the "Counterattack at Grainville" scenario in the Normandy '44 supplement, with a series of strung out, single BUAs that encourages the defenders to fall back, instead of starting them in a single defended area. We'll see if that's something that can be done.