Wednesday, August 25, 2021

Good Knight and Good Luck - Warmaster: Revolution AAR

Since Josh recently showed off a wonderful looking Goblins army for Warmaster, I set up a game with my Dogs of War so we could get a feel for the rules, and get some practice for the event at Historicon (barring any cancellations due to rising Covid cases. Who knows at this point...).


Terrain placement focused on a small village, surrounded by fields and the local lord's castle. One side of the road had more hills, eventually leading to a ridge (the table edge), while the other was forested, with denser concentrations of trees that acted as terrain pieces. 


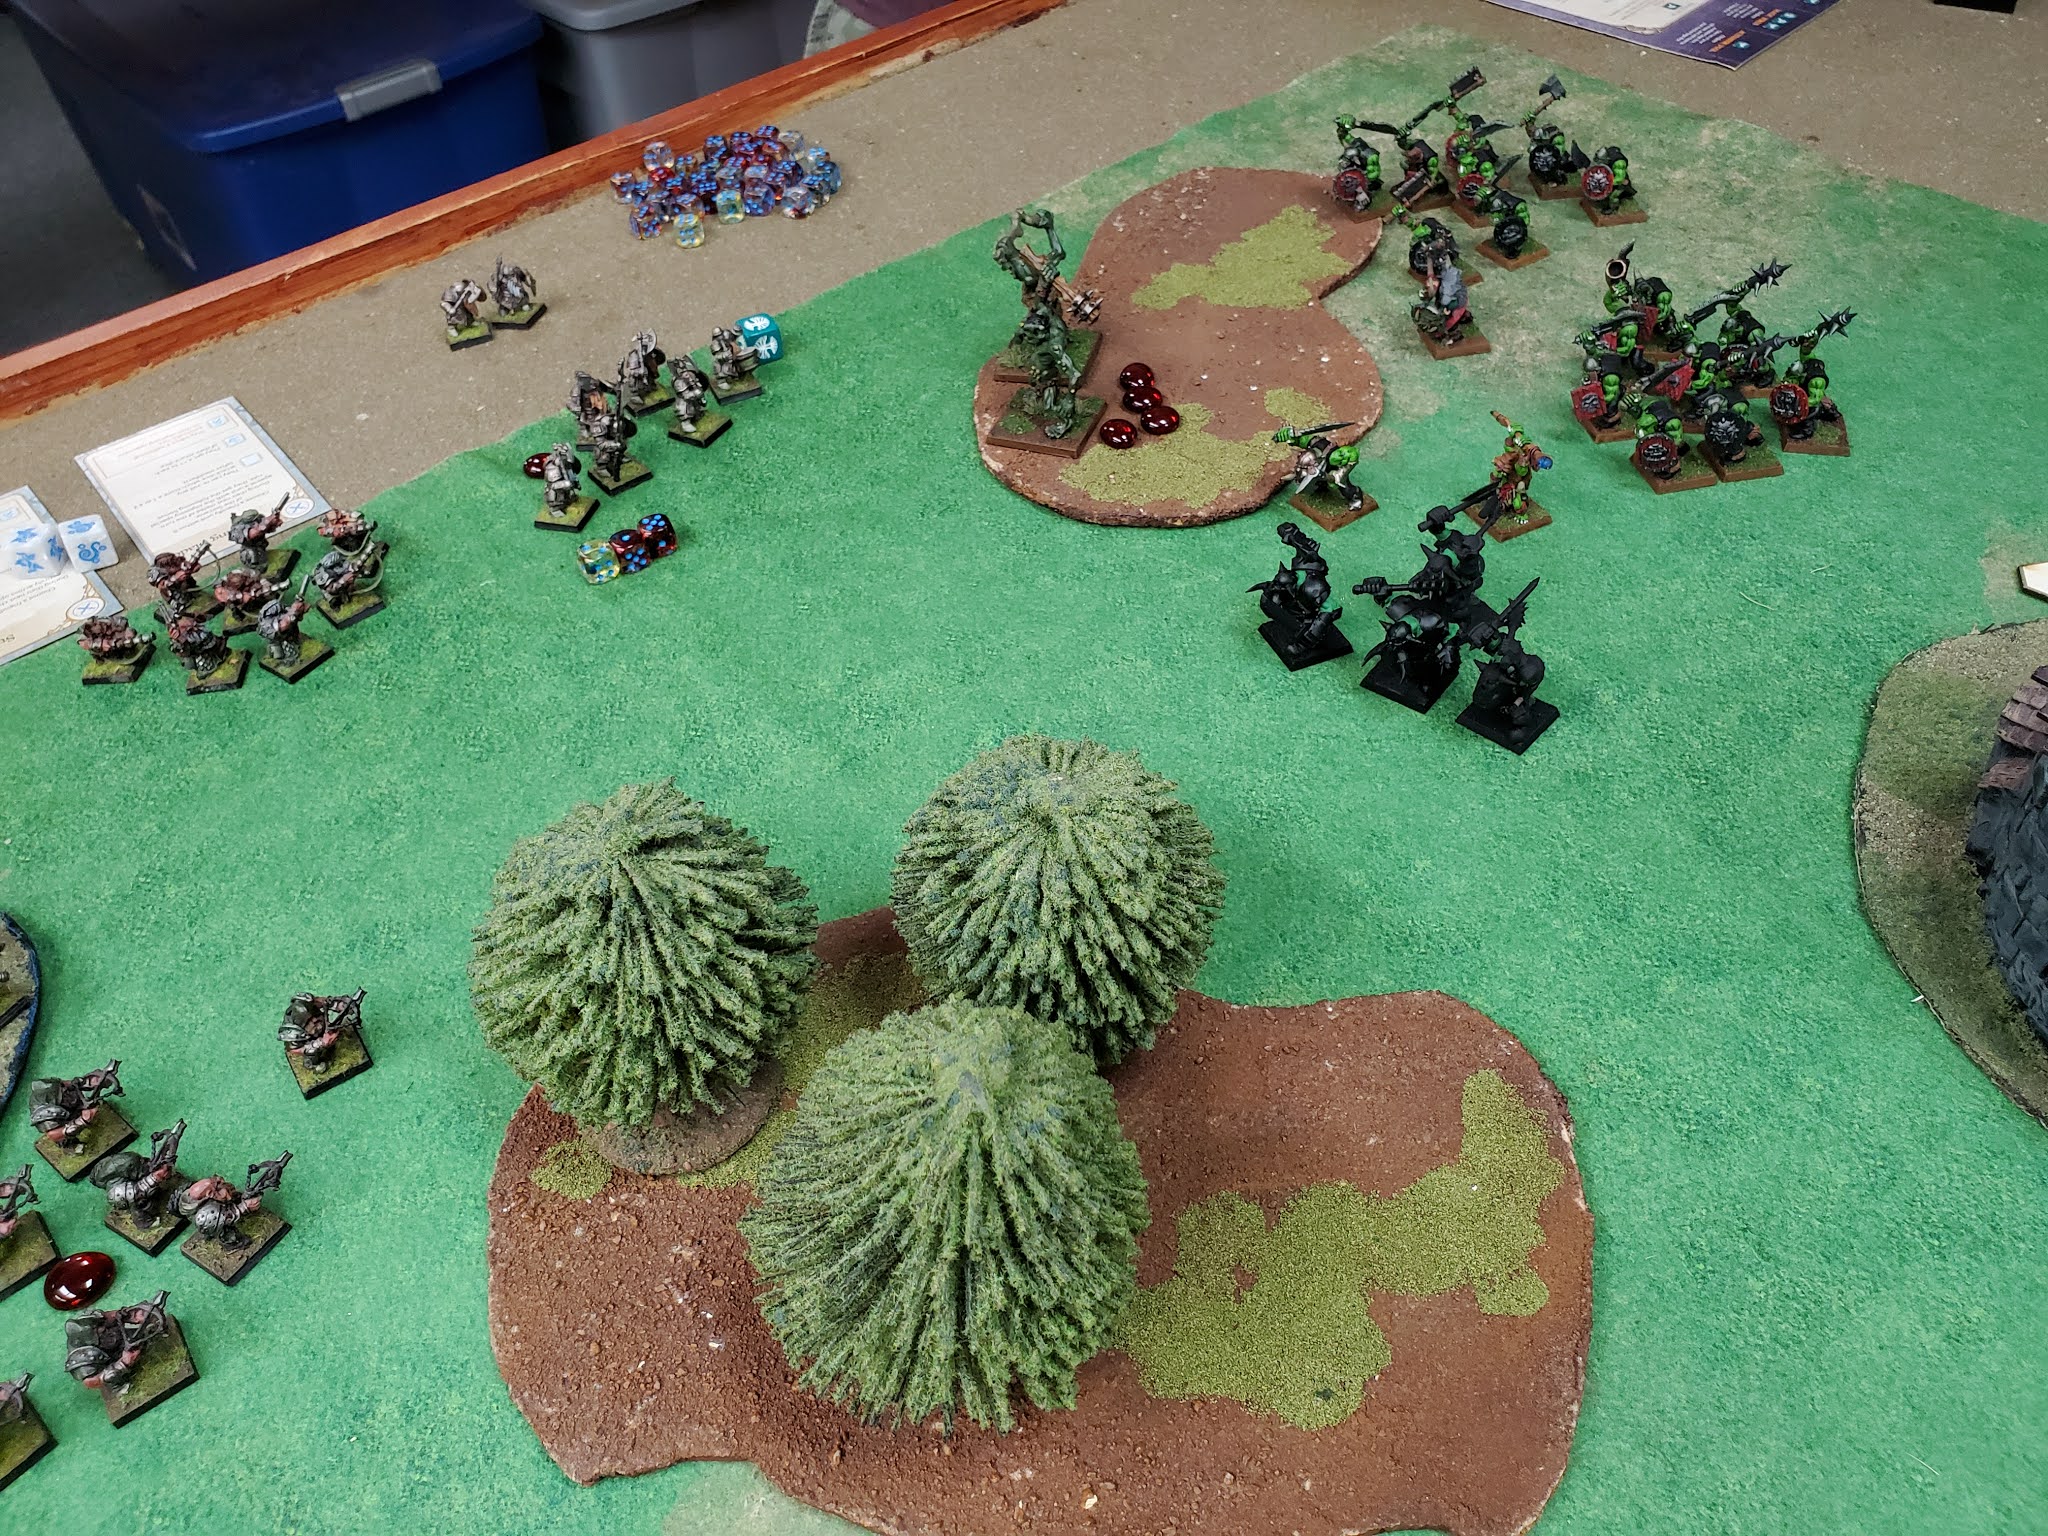
Josh and I brought 2000 point forces, and the scenario was a simple brawl to either a turn limit (6, 7, or 8 turns on a 4+ die roll) or break point (10 for me, 12 for Josh). 


The first turn saw both sides move cautiously from the start, although on Josh's part that was due to a lot of failed command rolls. 


Josh had pushed one of his brigades (Wolf Riders and a unit of Wolf Chariots) up to a gap between the castle and woods, so I sent in a small brigade of Knights to hopefully hit and destroy the units. 

The combat overall went well for the Dogs of War, with none of the knights taking any damage and the Goblins retreating. 


The little greenskins got their courage back when a wyvern-riding Hero and a Giant got into the combat. 


In an absolutely stunning reversal, all but a single stand of the Knights were wiped out, including the attached DoW Hero riding a Griffon.


The Giant made a quick snack of the remaining stand of Knights before moving on towards the remaining DoW Knights, who were now leaderless. 


Things were going a little better for the mercenaries in the center, where the Goblins masses were faced by a couple of pike blocks and the Ogres. Concentrated fire from the crossbowmen forced back a Giant that had wandered too close. 


On the left, things weren't exactly going great. I had loaded most of my forces in the center and right, so I only had a couple units of Light Cavalry and Galloper Guns. I lost one unit of Guns to Josh's massive artillery brigade, but nearly wiped out a unit of Trolls in return. 


My center was pushing strongly forward, wiping out goblin units left and right. But the real danger was the Giant, who could do a lot of damage when charging, if I couldn't surround it with my troops. 


Back in the woods, the greenskins were mopping up the Knights, and the lone Wizard was overrun and killed. 


With my artillery wiped out, I sent the Light Cavalry charging into Josh's artillery unit. If they could do enough damage before dying, then the artillery wouldn't be able to threaten my center. 


On Josh's left, his commanders were busy gathering the various wayward units into a coherent force. I moved my remaining pike block to face them. 


And in the center, my Pikemen had wiped out one brigade of Goblins, and my Ogres had singlehandedly destroyed another (with a little help from a friendly Wizard's fireball). 

The Giant was wounded and down to 4 attacks and 4 hits, but that wasn't enough to bring the beast down, so it still threatened the rear of my army. 


However, losing all those Goblin units was enough to push Josh over his break point! It was a very close game. I ended up with 9.5 unit destroyed, to Josh's 13.5. Had I lost an extra stand here or there, Josh's Goblins would have been the ones declaring victory. 

All in all, it was a great game, with lots of suspense and blunders on both sides. With Josh's 3D printers, he can pretty much print any army he'd like, so I'm looking forward to playing against, and maybe with, various other armies!

Wednesday, August 11, 2021

Keeping the Balance - Mythic Americas AAR

This past weekend I packed up the car and traveled up the length of the state to Mythicos Studios in North Jersey for a Mythic Americas event. 

While billed as a "beginner tournament," it was really more of a casual meet-and-greet. I got a chance to meet the designers and playtesters of the game, and got the chance to dive into some really juicy background lore of the Mythic universe. I was also shown some previews of upcoming models, and was even given a bunch of Inca models that were the first to be produced domestically, instead of by Warlord!

While up at the store, I did get a chance to play a couple game. Noticeably, everyone who had shown up brought Aztecs! Unfortunately the one player who had an Inca warband for the event wasn't able to make it. 

 
My first game was against Eric and was a mirror match with his Aztecs in the "Liberators and Captors" scenario. 

While it was a fun game, my dice were not on my side throughout the day. My first attempt at Magic with my High Priest (both the Warlord and the Magic User for the Aztecs) resulted in a miscast, which prevented him from casting spells for the next turn. My Ayar also blew up when it tried attacking a pinned down unit of Jaguar Warriors. And my own Jaguar Warriors were turned aside by a small, un-buffed unit of Bound Dead. 

I did manage to steal the one Captives objective that was in the center of the table!

With my offensive capabilities gone, I could only play defense and try to hold on to the Captives until the game ran out. Unfortunately I lost one, and didn't manage to score my Devotion. Eric did, so the game ended with a 2-3 loss. 


My second game was against Chris, the designer behind the Aztec faction. We played the "Build Altars" scenario, and for variety's sake Chris used a Tribal Nations warbands.

Unfortunately, my bad luck continued. My Warlord once again had a miscast on the first turn, and disappeared from the table for a turn (fortunately, Chris' Medicine Man had the same problem!). My unit of Marauders were wiped out in a single turn of shooting, and the rest of Chris' warband chewed through my Aztecs in a hail of stone-tipped arrows and tomahawks. 

While I managed hold on to a slight victory points advantage by throwing down as many altars as I could, in turn 5 Chris pulled out a solid reversal that I wasn't going to pull back from using his Devotion. I believe the game ended in a 4-6 loss. 

So while I look for new dice, I still had a great time. The store and the people in it were fantastic, and I'm excited to see where Mythicos takes the game and Mythic universe. 

Wednesday, August 4, 2021

First Halting Steps - Glory: 1861 AAR

A couple weekends ago, Keith and I finally met up for our first in-person game!

Keith had joined the SJGA during the pandemic, while we were only meeting over Zoom and had stopped our physical games. So it was nice to finally get a chance to meet him in person and roll some dice. 

While we had originally planned to play Mythic Americas, we were both excited to get our regiments for Glory: 1861 (which I have reviewed in a previous post) on the table and try out the game instead of just reading the rules. 

What followed was a fun, if frustrating, experience. 


Having already randomly generated our regiments, with Keith commanding the 5th Texas Infantry while I commanded the 2nd New Jersey Militia. 

We also both randomly rolled on the Aggressor scenario table, seeing this game as a fairly standard meeting engagement of two regiments during a larger battle. Keith's deployment saw him place two companies in skirmish order in front of the rest of his regiment's companies, which were in close order. His objectives were the two houses and the road exit on my side of the table.

My companies were ordered to deploy fully in skirmish order along the table edge. My objectives were the field, the barn, and the small copse of woodland on Keith's side of the table. 

We ended up ignoring the missions section of the scenario table, since they didn't seem to have any bearing on the game apart from flavor. 


I decided to put the better part of my companies on the left flank, sending them towards the field that was my main objective for the game. Keith sent his two furthest companies into and through the stream to establish a foothold on the other side. 


My other companies moved to defend the various objectives that Keith would seek to try and capture. 

We both had to deal with Slow and Useless company officers in our regiments. Slow officers took a phase to enact any orders given to them (so giving a company a Move order that normally only took 1 phase took 2), while Useless officers were even worst and ignored their orders on a d6 roll of a 1 or 2. 


Realizing that crossing the stream would take forever and force him to re-order his lines, Keith instead decided to push the bulk of his companies towards the single bridge that crossed the stream. This meant getting his men into March order before sending them over. 

My own companies were set up in Close Order, but the range was too long to have any real effect, since both sides were working with old smoothbore muskets. 


The same result happened on the other side, as I pushed towards the field that was only defended by a single company. The Confederates were saddled with some Terror, however!


We only played through turn 4, since most of the early turns went long as we worked out how the various rules transitioned from the books to our heads and then actually onto the table. 

I had gotten closer to the single company defending the extreme right flank of Keith's regiment and fired at them again with two of my companies. This time the fire was far more effective - half of the company's bases were killed and the rest routed.

Meanwhile, Keith was continuing to push his companies over the bridge and into a firing line to oppose my defending companies, who had reloaded and aimed at the oncoming Confederates. Had we continued, either side might have had the chance to fire first and deal the other a decisive blow. 

While we both enjoyed the framework of the game, Keith and I unfortunately came away with a page's worth of questions, concerns, and problems with the rules that weren't evident when we read them before having practical knowledge. Some aspects, like fixing bayonets, moving into March Order, and the use of the regimental commander's Combat Experience, are missing entirely. Other feature we decided to remove entirely, like the orders section of the scenario or the additional movement restrictions of terrain (instead deciding to make them rough ground or not).

It's a shame, because there's definitely something worthwhile in these rules, and they cover an aspect of wargaming that not many other rulesets do. After some discussion, Keith and I may either work on clarifications to the rules, or may write an entirely new set of rules to suit our purposes. 

On the positive side, this game did fire me up for more ACW gaming! While Keith and I hash out what we can do to improve Glory: 1861, I'd like to play some other rulesets, maybe Fire & Fury (Brigade or Regimental) or Pickett's Charge, and finally get to use those 10mm miniatures I've worked on. 

Wednesday, July 28, 2021

Skirmish at Żywiec - Bolt Action AAR

Before I went off for a week of vacation, the South Jersey Gamers Association got together for its first in-person meeting since March of 2020! 

Way back in the Before Times, the club had started to plan a series of campaign games to refight platoon-level games during the Invasion of Poland in 1939. Books were read, minis were assembled and painted, scenarios were thought out. And then the pandemic hit and in-person gaming wasn't an option. 

The campaign was postponed indefinitely until such a time that enough club members could gather again to play. We decided to use July's SJGA meeting to break out the miniatures, terrain, and Bolt Action rules to dip our toes in, and then start the campaign proper in September.


We kept the scenario simple. We made two forces from our German and Polish collections, each consisting of an infantry and a tank platoon. At 1275 points we had a lot to chose from, since Early War units and vehicles are relatively cheap. 

We used the Meeting Engagement scenario from the rulebook, with both sides deploying along the short table edges. We laid out the scenery starting the river and adding on from there, with fields on one side and a lightly wooded forest on the other. The banks of the river provided light cover to infantry units willing to stand in the water.

The game would last for 6 turns, with a potential 7th. To keep the game moving, both sides would be limited to 9 order dice in the bag, instead of the 15 that the Germans could bring and the 17 the Polish had. Both sides also had an off-table medium mortar. 

Bill, John and Tim commanded the Polish forces, while Chris, Brandon and I commanded the Germans. 


The Polish starter the game with a heavy armored presence, deploying all three of their 7TP's and the scouting armored car, as well as a motorcycle platoon and a towed anti-tank gun. 


The Germans ordered their infantry forward to the train station, while a single 38(t) and a 222 armored car moved along the road. 


The Poles continued to push forward, with the motorcycle platoon (ignoring their dismounts back by the disabled armored train) racing up the to river. 


The Germans continued to bring units on, with more tanks rolling  through the outskirts of the town. 

By this point, the snipers and mortar observers that both sides brought had mutually destroyed each other, with only the Polish sniper team remaining!


While the Polish motorcycle squad were able to reach the cover of the riverbed, their rifles and single Browning Automatic Rifle weren't able to compete with the multiple LMG's and MMG's that the Germans were firing with. 


The armored battle in the town was proceeding cautiously. The single Polish smoke round that they managed to land before losing their spotter had landed in front of the bridge, so Brandon used it to cover a 38(t) that took up a position behind a stone wall. Hoping to get a return angle, Bill and Tim pushed a 7TP out of a hedgerow. Both sides couldn't land a hit, however. 


The skirmish was developing nicely by this point, with both sides engaging around 2/3's up the table-length. 


Both sides of the tank battle had taken up defensive positions, engaging potshots. The 222 that had rushed up onto the bridge got the worst of it, with a stunned crew from a lucky 7TP hit. 


Another 7TP and a machine gun crew were rushing up to help out the battered motorcycle platoon. Seeing the lone Polish tank, the Germans had deployed a 38(t) to the train station as a counter. 


With the game nearing its end, Brandon summoned his inner panzer ace and pushed his tanks forward. Unfortunately the 222 suffered a hit from a 7TP and was destroyed. 


And even more unfortunately, the gambit didn't pay off. Tim and Bill  were free to use their 7TP's to return fire at the lead 38(t) which ended up battered, if not brewed up. 

Not content to let their armor do all the work, the Polish commanders brought on their infantry squads for a late game appearance. 

By then, however, the spearpoints had run themselves out of steam and the two sides withdrew to regroup. When the dust settled, the Poles had a slight advantage in victory points, gained mostly from their sniper that had survived the initial fighting. 

All-in-all, it was a great game for the club to return to. The limited order dice kept the game moving and forced both sides to consider where they needed their command resources most. We can also adjust the number of dice to show once side having a better command initiative. 

If I could change anything, it would have been to have the two forces deploy along the long edges instead of the short edges. With the scenario only lasting 6-7 turns, only a few infantry units managed to see any action before the game ended. Had we included more transports that might have been a problem, but the foot-bound infantry found themselves ignored in favor of the faster tanks, armored cars, and motorcycle troops. 

I do, however, think we can call the first in-person meeting of the year a success, and we're set up for the campaign to start properly in September. 

Wednesday, July 14, 2021

The Tale of Sir Chasm - Saga AAR

Josh and I continued our run of weekend games. This week we decided to pick Saga back up, but with the Age of Fantasy book. 

After a quick scramble to purchase dice (which we both forgot!) we cracked open the books. 


We decided to use the "Battle of Heroes" scenario from the Book of Battles to randomize the table and objectives. We were fighting in the Uplands, with two ruins, two pieces of rocky ground, and a woods in the middle. With the Confusion deployment, our warbands were diagonally opposed across the battlefield. The game length was Until Dusk (six turns), the special rule was A Dash of Nostalgia (Warlords generate two Saga dice), and the victory Condition was Subjugation (a straightforward counting of massacre points at the end of the game.

Josh had brought a Masters of the Underearth warband, using the Dwarves of the Silverheight legendary rules:
  • Warlord
  • Wizard
  • 8 Warriors
  • 8 Warriors
  • 8 Warriors with Heavy Weapons
  • 8 Warriors with Crossbows
  • 8 Warriors with Firearms
  • 2 Bipedal Creatures (Living Statues)
  • Static War Machine (Cannon)
I brought a Horde Warband, which seemed best suited to my Orcs & Goblins:
  • Warlord
  • Wizard
  • Lieutenant
  • 4 Hearthguard
  • 8 Warriors
  • 8 Warriors
  • 8 Mounted Warriors
  • 3 Bipedal Creatures (Trolls) 
  • War Chariot
The two warbands seemed well balanced against each other. The Horde battle board largely focuses on charging into combat, and increasing the number of attack dice thrown when charging. The Underearth battleboard has more table control, with abilities that can block or halt enemy units, improve ranged attacks, and use your numbers (either because there's more models in your warband, or you have better armor) against the enemy. 


With just three dice in the first turn (as per the Until Dusk scenario length), Josh managed to roll two rare dice results and used the Chasm ability to throw up an obstruction to my infantry, keeping them back for an entire turn. 


My cavalry moved out to the right, hoping to land some blows before the big infantry horde would arrive. 


In the second turn, Josh decided to throw his Warlord forward at the War Chariot instead of letting it get a charge off. Unfortunately, in order to do so the Warlord ended up going into the fight with three Fatigue. While the Chariot wasn't as good while defending, I just needed Josh to fail two defense die rolls to kill his Warlord early in the game. 

So with the Rage ability and some luck, the Warlord and Chariot ended up destroying each other. It was a trade I was willing to make (although my unlucky streak with Chariots continues!). 


Since the first turn Chasm had forced my Orcs into the rocky ground, I was trying to rush them as quickly forward as possible, while the Dwarves hit them with rifle, crossbow, and cannon fire. Luckily, the Horde has the Endurance ability, which is a reaction that gives a unit solid cover from shooting attacks. 


Annoyingly, my cavalry charge completely whiffed, with the Boar Riders bouncing off the well-armored Dawi warriors. The Dwarves followed up with a counter charge, leaving only two Boar Riders left. I had these remaining Mounted Warriors flee, rather then give them up as easy points for Josh. 


With my cavalry functionally gone, I bet everything on the remaining infantry units, who were still slogging forward towards Josh's defensive position in the ruins. By now both sides were starting to feel the loss of their Saga dice, especially since Josh had lost his 2-dice Warlord so early in the game. 

My Wizard managed to get a fantastic round of combat thanks to his Transformation spell, which turned him into a Beast-mounted Warlord. The transformed Wizard wiped out a unit of Dwarf warriors whose crossbows had riddled the Orc Hearthguard before they ever got a chance to get into combat. The Orc Lieutenant followed up and wiped out most of the other unit of ranged Warriors equipped with firearms. 

With that last turn, the game ended, and the two warbands retreated to lick their wounds and count the dead. Josh's Dwarves racked up an impressive tally, scoring 29 massacre points. The Orcs didn't do too badly either, scoring 25.5, which rounded up to 26. As the Dwarves didn't manage to pull ahead on points, the game ended up as a tie. 

As Mythic Americas adds to Warlords of Erehwon to provide flavor to a somewhat vanilla system, Age of Magic adds just enough to Saga to give it a very different on-the-table feel compared to its more historical counterparts without slowing it down. The six factions or archetypes have enough variety in their units and from their battleboard to feel distinct, and you could even have two warbands of the same archetype use radically different approaches. The larger warbands didn't feel slower, since single-model or 2-3 model units are common. And magic was pretty easy to use, especially since the Wizards themselves are fairly static (you don't have to worry about magic levels or equipment, and each wizards get to pick three spells from two different schools of magic, depending on their faction). 

A fun game that feels different enough from Warlords of Erehwon to deserve time on the table.