Wednesday, February 27, 2013

Action in the Vella Gulf - General Quarters 3 AAR

Last weekend, Curt and I participated in another game of GQ3. This was a full-on game, with 7 players (4 Americans, including me, and 3 Japanese). The scenario was another night-fight set in 1942. This time, there were two objectives for both sides to complete, instead of just one.

Earlier in the day, the USS New Orleans had been crippled during a fight, her engines damaged and the ship left dead in the water. Two destroyers, the Laffey and the Meredith, had been assigned to protect her until the New Orleans' crew could get her back into working order. With the sun finally setting, the New Orleans had finally managed to get her engine back into working order, albeit with a reduced speed. Unfortunately, the Japanese were aware that a crippled US cruiser still floated out on the water, and so a number of ships were sent to sink her.

Even with the intense fighting between the two fleets, land troops fighting on the nearby island still needed supplies. The Japanese, with troops stationed on the nearby island of Kolombangara, decided to send a small convoy of supply ships to refit the infantry. The Americans, knowing that the Japanese often sent supplies under the cover of night, had sent out a small taskforce of destroyers to find these ships and sink them.


The marked off area represents the table we played on.

American Fleet:
USS New Orleans (New Orleans-class Heavy Cruiser, Flagship)
USS Laffey (Gleaves-class Destroyer)
USS Meredith (Gleaves-class Destroyer)
USS Chevalier (Fletcher-class Destroyer)
USS Mahan (Mahan-class Destroyer)
USS Fletcher (Fletcher-class Destroyer)
USS O'Bannon (Fletcher-class Destroyer)


My two ships - the Meredith and the Laffey.

Japanese Fleet: (An apology - I don't happen to know all the names of the Japanese ships, but I'll try to give a best representation of what was on the table)
IJN Isuzu (Nagara-class Light Cruiser)
Kagero-class Destroyer
IJN Nagara (Nagara-class Light Cruiser)
Destroyer
Destroyer

The Game:

I'll do an overview of the game with the pictures below as a complement. It started out well (i.e., terribly) enough. The New Orleans was spotted immediately by the two Japanese groups that were coming from behind her. While the Orleans moved away, the Laffey and Meredith (who had been tailing the Orleans) moved to intercept the Japanese ships, with one US ship going after each enemy squadron.

The Mahan, Chevalier, O'Bannon, and Fletcher made a wide maneuver around the edge of the table, apparently hoping to skirt the action and intercept the convoy ships as quickly as possible (but not before taking a shot at the Orleans, who hadn't been identified before the ships opened fire).

The Laffey and Meredith, meanwhile, managed to stall the Japanese ships for a little while, with the Laffey sinking a Japanese destroyer with her torpedoes. The Meredith, unfortunately, was sunk when the Japanese launched their own torpedo salvo, but not before causing a bit of trouble in her own right.

The Orleans, apparently emboldened by the arrival of more destroyers, joined the new group that began to swing to meet the delayed Japanese attack. A mistake, however, caused the Orleans to slam into the Mahan and the two ships were left behind as the Chevalier, O'Bannon and Fletcher surged forward to attack the arriving convoy ships.

In what seemed to be an amazing and disastrous turn of events, the Japanese managed to sink the Orleans (though not before the Laffey managed to slip right through them), and the gunnery skills of the convoy ships actually managed to cripple the Chevalier. The O'Bannon and Fletcher managed to meet up with the Laffey to launch another attack, but it was decided that the 3 battered ships wouldn't have made it, and they beat a hasty retreat.

It was a stunning victory for the Japanese!


The New Orleans is spotted!


The Laffey and the Meredith move in to protect the New Orleans.


A bad, bad position to be in.


The Laffey sinks a Japanese destroyer, then runs for it!


The New Orleans heads for the (assumed) safety of other American ships. 


And the Meredith goes down after a savage beating. 


Looks like the Laffey's in trouble!


But the Japanese cruiser has bigger problems to worry about.


The Laffey heads for the safety of a fog bank - just beyond the rest of the Japanese ships!


The Japanese move in for the kill...


As the convoy ships show the Americans who's boss!


As the Orleans takes a beating and sinks, the Americans ready for another go before calling the retreat.


And the convoy moves away with the MVP title in tow!

Wednesday, February 6, 2013

Painting Update - FIW

Another painting post, this time showing the finished militia units for my French-Indian War project.

Here they are:


I need to add another two 10-man units for a full 'detachment' of militia, which I can then add into whatever mixture of Provincial, Regular, Ranger, or Indian forces (I'll also need to replace the current officer with something a bit more 'official' - most likely with a tricorner hat!). Militia made up a large part of the forces that fought in the French-Indian War, especially since a large part of it was fought in a non-traditional way for the European officers, many of who couldn't adjust their tactics to make up for this fact.


Next on my list is the French milita, and then the Indians. I've got to say, these Blue Moon packs are fantastic - all you need is a couple for a decent detachment of troops, and at $15 for 30 18mm miniatures, they're fantastically priced!

Wednesday, January 30, 2013

Painting Update - WWII

I'm so sorry for that.

Anyway, I've finally gotten Curt's Fallschirmjager painted and coated, which means in addition to his StuG's and Tigers, he's got everything he owns for FoW painted!

So here's some shots of the infantry:


Next is finishing up what what I own for my British (more tanks and a troop of Sextons), and then I'll most likely move on to my Germans.

Wednesday, January 23, 2013

Contested Ground - Flames of War AAR

Curt and I had another game of FoW recently (our last one before the end of winter break). Once again, my British and his Fallschirmjagers clashed in Normandy.


We decided we wanted a quicker game this time (and that backfired horribly), so we took a couple of simple 1000 point infantry lists with limited support. Oh, and by the way - everyone was painted! We did it! Woohoo!
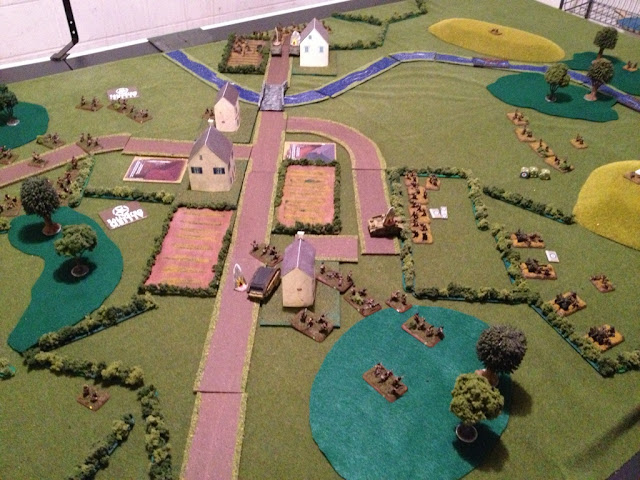

I took a rifle company from the 51st Highland Division (Reluctant Veteran). I had 3 infantry platoons, a platoon of 6-pounder guns, a platoon of mortars, and a troops of Shermans.


The Germans consisted of 2 platoons of infantry (which kampfgrupped into 3 smaller platoons), a platoons of mortars, a pair of Pak 40's, and a pair of StuGs.

We rolled up Dust Up as the mission, and I was the attacker. I decided to hold two infantry platoons and the tanks in reserve, and Curt did the same.


My own plan was to have the guns take up positions in the nearby hedgerows. With AT 10, RoF 3, and the ability to engage infantry with HE, I would use them to hold back the Germans that would go after the two objectives in my corner. My infantry would go through the town, with the mortars backing them up. My hope was my armor and additional infantry would be the main attacking force.


Curt deployed his Germans much in the same way - infantry in the center, supported by mortars, and the Pak 40s holding down the other side.


Not much happened in the first two turns. Both forces advanced on the town, with the mortars setting up and firing. The British mortars managed to pin down the German infantry, but they unpinned in their subsequent turn. The German mortars, however, failed to hit any of the advancing British infantry.


The Brits managed to close with a couple of teams that had advanced into the town and wiped them out, consolidating into the field in the center of the table. The returning German fire took revenge for their lost comrades, and then stormtroopered back into cover. I should mention that both sides failed to bring reserves onto the table.


The reserves failed to show up for the fourth turn as well. I decided to pull my infantry back out of the field. Curt's infantry dug in and his mortars pinned my infantry down.


My reserve troops apparently decided to break out the tea and biscuits, since they still hadn't shown up. The Germans, on the other hand, had already finished lunch, with the StuGs accompanying a platoon of infantry onto the table. The platoon of infantry I had just behind the field was pounded with MG fire, but managed to stick around.


Finally, my reserves arrived! With a platoon of infantry and the Shermans pushing on the far side of the table, I still had to worry about my center. I had my infantry fall back further, and then covered them in smoke from my mortars. The Germans advanced, but the houses and woods kept them from firing. The last Fallschirmjager infantry platoon arrived as well.


Finally, the last of my reserves arrived. My Shermans started a long ranged firefight with their armored opposites, and managed to knock one out. I also had my infantry in the hedges dig in. The Germans shifted a little bit, but the remaining StuG failed to tag any of the Shermans.


Turn 8 saw a minor German victory. With my troops in the hedgerows buttoned up, I started advancing my other platoons in a conga-line to get them over the river. German fire, however, sees one Sherman destroyed and another bailed.


With my infantry still advancing on the river, my mortars decided to lay down some fire on the Pak 40's, and in a stunning round of fire, knocked both guns out and forced the platoon command team to run. The remaining Sherman attempted to deter the advancing Fallschirmjager with its MGs, but to no avail. The remaining StuG hit and destroyed the Sherman troop commander, and the remaining tank decided to run for it.


The remaining infantry platoons on the far side managed to knock out the Fallschirmjager company command team, the panzerschreck team, and the last remaining team of the platoon they were attached to. In return, the remaining platoon on that side forced a British platoon off, but the last StuG was lost due to defensive fire from the 6-pounders.

And with that, we reached the appointed end time. We decided the call the game a draw - Curt didn't have his company commander, but his remaining platoons could have done some real damage to my own force. Most likely, we decided, the game would have devolved into our mortar platoons exchanging fire for a while, and we didn't want to sit through that.

I blame the length of the game on the fact that we both played infantry companies, and because we both lacked fast-moving assets in such low-point lists. That said, I enjoyed the game, and it was a fun send off.

Thursday, January 10, 2013

Somewhere in the South Pacific, 1942 - General Quarters 3 AAR

Curt and I attended a demo game of General Quarters 3, a (relatively detailed) set of rules for naval actions in WWII. The game, hosted at the wonderful nearby 7th Dimension Games, was prompted with the following intro:

It’s 1942 in the South Pacific – almost a year after Pearl Harbor jumped the USA into World War II. The Imperial Japanese Navy is running supplies and troops to their army almost every night through the center of the Solomon Islands chain – The Slot – to try and retake Guadalcanal’s critical airfield. They have been ordered to “supply or die” and the US Navy is committed to stopping them. Every night a deadly game of cat-and-mouse occurs with the USN trying to intercept the Japanese ships and transports. The question is, who is the cat and who is the mouse?

The fleets were as follows, with all ships, except for one, being destroyers:
Japanese -
IJN Akatsuki (Me)
IJN Naganami (Curt)
IJN Kagero
IJN Isuzu, the light cruiser

American -
USS O'Bannon
USS Lamson
USS Fletcher

The Game
The game began with both sides getting an extra 'blip' to put on the table. Our GM informed us that, to the west (the far side of the table in the first picture), there was an island that would help confuse the American radar returns, so we decided to come in as a line from the North-west (little did we know the American would do the same!


Both sides attempt to acquire the other - while the Americans failed to acquire us, they did manage to detect our ships, so our positions were quickly revealed. Curt and I, however, showed our ability to roll low, and we both scored the necessary '1' on a d12 to acquire the American ships. This was quickly shared with the other two ships in our ad hoc squadron.


As the two forces drew nearer, the American manged to acquire all of the Japanese ships, apart from Curt's Naganami. The Japanese attempt to fire torpedoes, but a miscommunication has most of them turn out to be decoy launches. Whoops!


The Americans realized that their positions were off when the Lamson, the leading ship, made a complex movement that the rest of the ships in the squadron failed to follow. This being a demo game, the GM and table agreed to move the Americans into their proper positions. Torpedoes were (actually!) launched by the Japanese, and an amazing shot from the Isuzu flew straight and true... right into the Lamson, which was also the acting commander of the USS force.


The ships continued to approach, with the Americans getting their torpedoes in the water. The Lamson makes a daring move, opening up to full speed and attempting to move straight past the Japanese ships. It's during this action that the Akatsuki (i.e., me) made a bad call, using a spotlight to illuminate an American ship.

This unfortunately led to the Americans pounding the Akatsuki, and she lost both guns, two of her 3 torpedo-launching stations, and her spotlight. More worrying were the hits to her bridge and engineering, as well as a bulkhead breach. She wasn't crippled, however, and I began to move her out of the way of the battle once I got the situation under control (the Japanese needed a decisive victory to win, and I wasn't going to let the Americans take the Akatsuki as an easy kill).


The Lamson continues to speed towards the Japanese rear. The Japanese torpedoes, however, hit their mark, essentially crippling one of the American ships (the Fletcher, I believe). While the crew failed their morale roll, the ship herself was still capable of firing most of her guns, so the Japanese avoided finishing her off as she limped away at 5 knots.

Seeing the Lamson moving past, the Kagero and Naganami decided to break off and pursue, while the Isuzu began to turn.


In the end, the Lamson managed to get away, breaking into the Japanese rear. The O'Bannon took enough hits from the three remaining combat capable Japanese ships that the GM declared her effectively neutralized. A quick tally of victory points showed that the Japanese had won a morale victory, which would look good in the Japanese newspapers, but wouldn't help the war effort.

I have to say, I really enjoyed the game. If I had to nit-pick about something, it was the amount of charts that were necessary to play the game. However, my inability to pick up the charts was mostly likely due to the fact that the Akatsuki was knocked out and unable to do much in the middle of the game. Curt, on the other hand, not only picked up on the charts, but was soon showing the other players what to do when they were attempting to fire at one another.

In what may be the most telling show of our opinion of the game, Curt and I are now looking around for some 1:700 ships to put together (which would have been much easier had Herb's not closed, though in what seems to be some sort of heavenly-ordained coincidence, I did find and buy a copy of the Osprey Publishing 'USN Destroyer vs. IJN Destroyer, 1943' book. Weird).